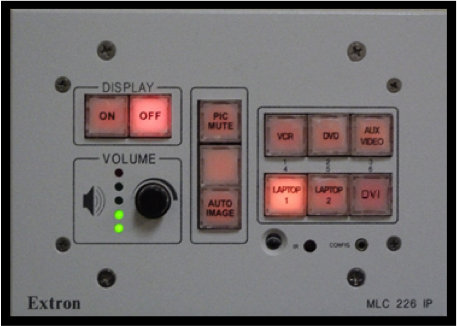
Extron MLC-226 Control Panel
Quick Start Operating Instructions
1) TURN ON THE MEDIA SYSTEM
- Press the DISPLAY ON button.
- The button lights will flash while system warms up.
- Lower the projection screen.

2) SELECT A SOURCE:
- Press a source button (VCR/DVD/LAPTOP 1, etc.).
- Selection will remain illuminated.
- Connect laptop or insert necessary media (DVD/VHS, etc.).

VGA cables can be found in the rack drawer located in the cabinet or black box.
3) ADJUST VOLUME:
- Turn VOLUME knob to raise or lower speaker volume
The volume knob controls both computer audio and DVD/VHS audio, depending on which source you have selected. Please ensure that your laptop volume is not muted.
4) TURN OFF THE SYSTEM AFTER USE:
- Press and hold the DISPLAY OFF button for three seconds.
- The button lights will flash while system cools down.
- Return the projection screen to the raised position.
During this three minute cool down process, system restart cannot occur.
5) QUESTIONS OR EQUIPMENT PROBLEMS?:
- For immediate assistance, please call CTS at (617) 353-3227.
- Send an email to classrooms@bu.edu to report equipment issues.
Detailed Operating Instructions

START UP
- Press and hold the DISPLAY ON button on the Extron panel for three seconds. The button lights will flash while the projector warms up — this is normal. ALWAYS turn the system on at the panel — you will never need to touch the actual projector.
- Wait 45 seconds while the projector warms up. Do not press any buttons on the panel while the projector is warming up.
- Lower the projection screen at the front of the room.
SHUT DOWN
- Press and hold the DISPLAY OFF button on the Extron panel for three seconds. The button lights will flash while the projector cools down — this is normal. ALWAYS turn the system on at the panel — you will never need to touch the actual projector.
- Disconnect the 15pin VGA cable from your laptop and the input jack. Please return the cable to the rack drawer in the cabinet or black box.
- The projector takes about three minutes to cool down.
You will not be able to restart the system until the projector cools down.
- Return the projection screen to the raised position.
DISPLAY LAPTOP
VGA
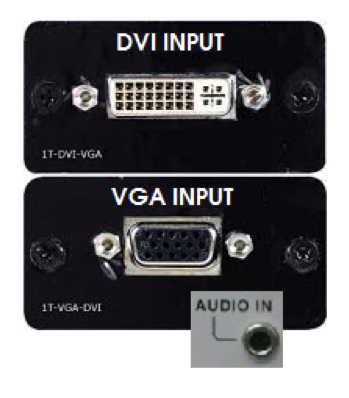
- Remove 15pin VGA cable from the rack drawer located in cabinet or black box.
- Connect your laptop, using the cable, into either the LAPTOP 1 or LAPTOP 2 input jack. If using Computer Audio, please also connect the 1/8” stereo mini connector to both your laptop and the wall jack. If you are using a Mac laptop, you will need to provide your own VGA adapter, as Classroom Technology Services does not provide Mac adapters.
LAPTOP inputs vary in location, but are most likely located at the front of the room and/or in the equipment rack.
- Turn on your laptop.
- On the Extron control panel, choose the LAPTOP button corresponding with where you plugged in the cable (LAPTOP 1 or LAPTOP 2). Even if this button is already lit, deselect and then reselect it now.
DVI
- Connect a DVI cable to your laptop and the DVI input jack (if you do not have your own DVI cable, please contact Classroom Technology Services at (617) 353-3227).
- On the Extron control panel, choose the DVI input button.
DVI capabilities exist in only the following rooms: PSY-B47, SOC-B65, SOC-B67 & STH-B20.
DISPLAY DVD OR VCR
- Insert your DVD or VHS tape into the player.
- On the Extron control panel, press the DVD or VCR button, depending on which you want to display. Even if this button is already lit, deselect and then reselect it now.
Some rooms are equipped with a combination DVD/VCR player. The function is the same, but the input button choice will be labeled “DVD/VCR”).
- Adjust the volume level with the volume control knob on the Extron control panel.
- If you require a remote control and there is not one in the rack drawer, please contact Classroom Technology Services at (617) 353-3227.
AUTO IMAGE (also Auto Pixel Alignment or APA)
- If your image does not initially display properly, select the AUTO IMAGE option on the Extron control panel. By connecting a computer signal source and pressing the AUTO IMAGE button, the projector will optimally align the image pixels without requiring laptop adjustments such as changing the image resolution.
PIC MUTE
- Pressing this button will turn off the projected image without having to shut down the projection system. Press the button again to restore the image.


