
Institute Spotlights
The Institute for Excellence in Teaching & Learning is currently engaged in several strategic cross-collaboration initiatives designed to strengthen and enhance the student and faculty experience.
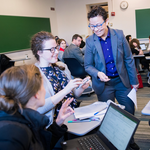
The Institute in BU Today
New BU Initiative Focused on Elevating Classroom Experiences Through Greater Collaboration. Institute for Excellence in Teaching & Learning seeks to improve the learning experience across campus by encouraging stronger cooperation between BU’s schools, colleges, centers, and institutes. By: Doug Most

McCahan Medical Campus Education Conference
Join the Institute for Excellence in Teaching & Learning at this year's McCahan Medical Campus Education Conference on May 28th in the Hiebert Lounge on the 14th floor at 72 E. Concord St. for a facilitated session on Creating a Game Plan for AI in Teaching & Learning at 11:15 am.

AI at BU Student Certificate
In partnership with AIDA, the Institute for Excellence in Teaching & Learning has launched the AI at BU Student Certificate—a free 4-hour, self-paced fully online course designed to introduce students to the fundamentals of AI and its responsible, ethical, and effective use in academic and professional settings.

The 2026 Shipley Academic Innovation Award Winners
The Institute for Excellence in Teaching & Learning proudly announces the recipients of the Shipley Academic Innovation Fund Award, recognizing faculty-led initiatives that leverage artificial intelligence to reimagine teaching, learning, and academic innovation.

Campus LX Transformation Initiative
Launched by the Institute and IS&T, in collaboration with faculty across BU’s schools and colleges, the goal of this initiative is to elevate and enhance our teaching and learning experiences through the use and adoption of technology. As part of this initiative, we will be working to update our core learning management system (LMS), with the goal of providing faculty with a strong framework and student experience to support their classroom teaching.

Enhancing Student Success in Large Classes
In collaboration with several programs in BU’s College of Arts and Sciences, the Institute is engaged in a multi-year initiative to redesign the student experience in large classes that typically have 100 or more students. This initiative provides an opportunity to reimagine and develop new approaches to course redesign, student assessment, classroom teaching techniques and the creation of instructional resources that promote engagement and learning in some of BU’s largest introductory courses.

The Shipley Center: Academic Innovation Funding
The Shipley Center for Innovation in Teaching & Learning currently invites proposals to advance excellence and innovation in health education at Boston University. Attend our upcoming information session and learn more about opportunities for collaboration across disciplines and units.

Faculty Voices
In conversation with the Institute for Excellence in Teaching and Learning – a series of thought-provoking exchanges designed to introduce new approaches to teaching that engage students and boost learning outcomes.
Click to read our most recent faculty Q&A with with AnneMarie McClain, Assistant Professor of Media Science in BU’s College of Communication.

Programs & Services


News & Announcements
The latest news and announcements on teaching and learning from the Institute.
How a Startup Mindset Inspires Innovation in Higher Education
Related posts: Academic Innovation Q&A

BU Transitions to Blackboard Ultra
The Daily Free Press reports on BU's transition from Blackboard Original to the latest platform, Blackboard Ultra, and how the Institute for Excellence in Teaching & Learning is working to support faculty along the way.

BU Establishes New AI at BU Course
The Daily Free Press explores BU’s new AI at BU certificate course, designed to help every student to feel confident and informed in using AI technology responsibly and effectively.

Academic Innovation Q&A
In this Inside Higher Ed article, Vice President and Associate Provost of the Institute for Excellence in Teaching & Learning and BU Virtual Wendy Colby discusses the role of academic innovation centers for teaching and learning (CTLs) within the university ecosystem.
