Ergonomics Homepage
Ergonomics is the science of fitting the task to the work to maximize productivity while reducing discomfort, fatigue and injury.1 Additional side effects include better quality of work and more satisfied employees. This webpage provides resources and guidance on how to set up your office computer workstation, remote workstation and laboratory workstation to be more ergonomic.
Computer Workstation Ergonomics
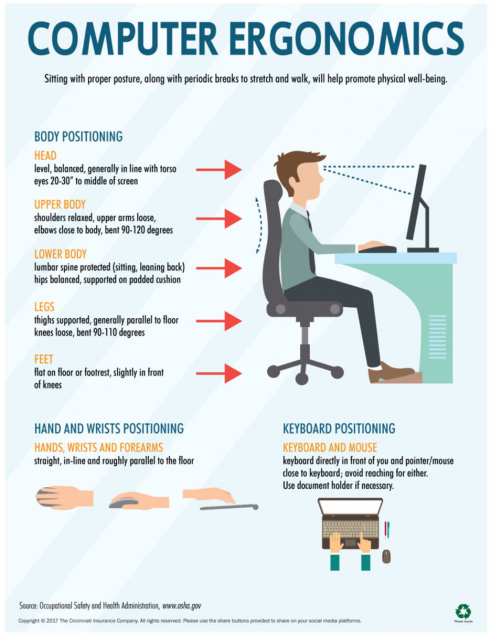
An ergonomic computer workstation will promote neutral spine and minimal muscle activity in the seated position. Any degree of repetitive contraction or static posture could lead to musculoskeletal injury if they occur at high duration and frequency. Each section focuses on different aspects of the computer workstation and describes how to position equipment for an ideal ergonomic setup. If you have further questions, you may request an ergonomic evaluation from trained EHS staff at the following link.

 The Keyboard
- Keyboard should be positioned directly in front of you. Line the middle of the space bar up with the middle of your monitor (Figure 1).
- If you have a keyboard tray, position it 1.5 – 2 inches above your thighs. If not, position it just below your elbow height. You may have to raise your seat to accomplish this.
- If you hold your arms out straight ahead of you, your hands will naturally drop to the floor (also known as “Zombie arms”). This is what a neutral wrist position looks like. It can be replicated by creating a negative tilt with the keyboard tray such that your fingers are closer to the floor (Figure 2)

 The Mouse
- Position the mouse just below elbow height on the keyboard tray or adjacent to your keyboard.
- Contact between your hand and the desk or keyboard tray should take place on the outside of your hand or your palm. You never want contact below your palm where your median nerve and transverse carpal ligament are. This could lead to wrist discomfort and, in prolonged cases, carpal tunnel syndrome. (Figure 3)
- The mouse should promote approximately a 45 degree angle to reduce contract stress to your wrist. (Figure 4)
- Alternate input devices such as a roller ball or keyboard roller mouse may be more comfortable for you if you are dealing with significant wrist discomfort.

 The Monitor
- Position the monitor between 18″ and 26″ away, depending on your eyesight. An arm’s length is the easiest way to measure the maximum distance.
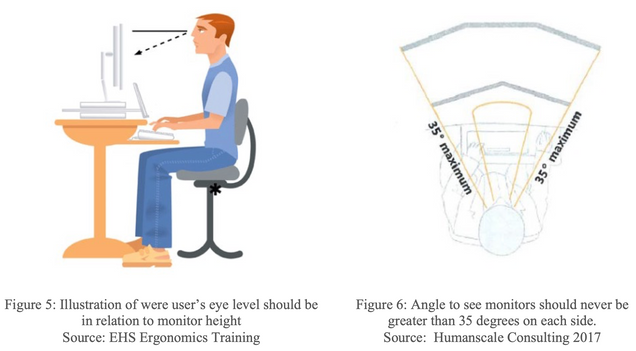
- The screen top should be at eye level (Figure 5).
- Position the monitor centered and directly in front of you.
- Tilt the bottom of your monitor up to avoid dropping your head and promoting neck strain.
- When you are typing, your head should be erect and centered over your shoulders.
- Avoid neck rotation by aligning multiple monitors side by side. You never want to rotate your head more than 35 degrees to see the screen (Figure 6).

 Lighting
- Place the monitor perpendicular to windows.
- Check the screen for “hot spots” from overhead lighting. Reposition the screen away from them or purchase anti-glare devices.
- When using task lighting, position it opposite of your writing hand and below eye level (Figure 7).

 The Chair
- The chair should have five rolling casters on the base to increase stability and allow you to move the chair easily.
- The seat pan should support at least ¾ of your thighs. You should be able to sit with your back supported and not have the back of your knees touch the seat.
- The backrest should be slightly tilted so that you can lean back as you are typing.
- The seat height should be adjusted so your feet are flat on the floor with your knees slightly lower than your hips. If necessary, place a box under your feet.
- While armrests are nice, they are only useful if they actually support your arms at the right height. Your shoulders should be relaxed and your arms at right angles when you type. Many armrests are too wide or too high in commercial chairs.
Ergonomics – Does Your Work Space Fit You? Video – Brigham and Women’s Hospital
Laboratory Ergonomics
Laboratory staff are at risk for developing cumulative trauma injuries because of the repetitive nature of their work (i.e. pipetting, working with small tools). In addition to the repetitive nature of the work one also has to deal with the awkward postures in which some of the work is being performed (i.e. microscope use, Biosafety cabinet work, fume hood work) Over time these repetitive motions can lead to injuries due to inflammation, pinching of nerves, and restriction of blood flow. In order to reduce the chances of occupational injuries one must become familiar with how to control laboratory ergonomic risk factors thereby increasing worker comfort, productivity, and job satisfaction.
Common Risk Factors in the laboratory setting:
- Repetition: performing same task over and over again.
- Awkward Body Posture: Holding a bent position for extended period of time of your neck, hands, wrists, or back while performing laboratory work.
- Force: Pressure or physical exertion that is applied to any part of the body while workings.
- Contact Stress: Pressure on soft tissue surfaces of your body while working with or manipulating instrumentation.
- Extreme Temperatures: having to work in cold rooms.
Common Tasks in Laboratory setting that involves above risk factors:
- Pipetting (involves repetition, force, and awkward posture)
- Microscopy (awkward body posture, contact stress)
- Biosafety Cabinets and Fume Hood work (awkward body posture, repetition, contact stress)
- Microtome Work (Force, repetition, contact stress, etc)
- Micro-manipulation (repetition, force)
Video on Pipette Safety & Ergonomics
Additional Resources
- Computer Workstation Stretches
- Working From Home Resources
- Mayo Clinic Guide on Office Ergonomics
- OSHA eTool
Ergonomics Assessment Online Forms
References
- Humanscale Consulting. (2017). Two Day Certification Program in Office Ergonomics. New York, NY: Humanscale.
- Baker & K. Jacobs (1999). Boston University Sargent College of Health and Rehabilitation Sciences. Occupational Therapy Department.