Mounting ENGNAS
Network drives like ENGNAS provide a convenient way to store, share, and access data on and off campus. Computers that are joined to Active Directory (AD) will automatically have these network drives mounted. Instructions on mounting network drives from computers that are NOT joined to AD can be found below, please be sure to choose the correct operating system.
Note if you are connecting from off campus you will first need to connect to the VPN.
Windows
1. Open File Explorer. A nice keyboard shortcut to do this is Win +E.

2. In the new File Explorer window, right-click “This PC” in the left hand navigation pane. Select “Map network drive…”. Note in Windows 7 “This PC” is labeled as “Computer”
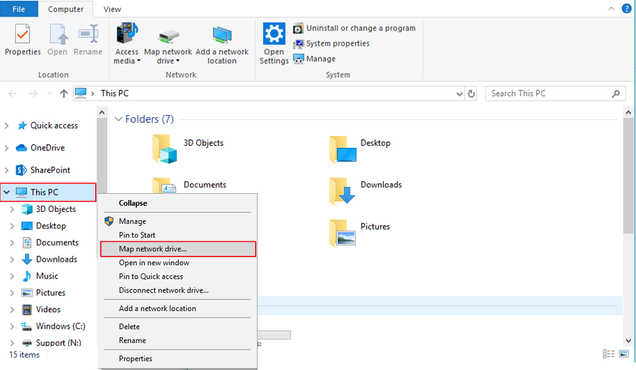
3. In the new “Map Network Drive” window, select an appropriate Drive: letter, then specify the Folder: (network path) you wish to mount, and check-off “Connect using different credentials.” The table below contains the drive letters Engineering IT uses, as well as the full network path. Use that table to fill in the “Drive:” and “Folder:” fields.

| Drive Letter | Address |
| V | \\engnas.bu.edu\courses |
| W | \\engnas.bu.edu\administration\eng_administration OR \\engnas.bu.edu\administration\pho_administration |
| U | \\engnas.bu.edu\research |
| X | \\engnas.bu.edu\users\<1st_Letter>\<2nd_Letter>\<username> Example: user patsmith is: \\engnas.bu.edu\users\p\a\patsmith |
| N | \\engnas.bu.edu\support |
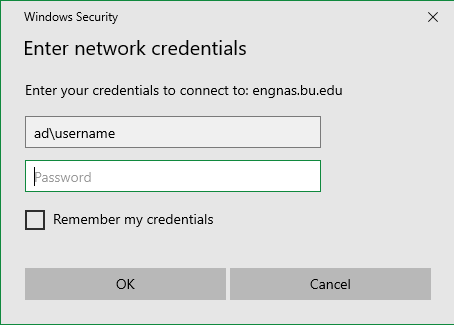
4. In the new dialog, enter your BU credentials as: ad\username and your Kerberos password. Click “OK”. Note that you need the “ad\” and should replace “username” with your own BU username.
Mac OS 10.6 and newer
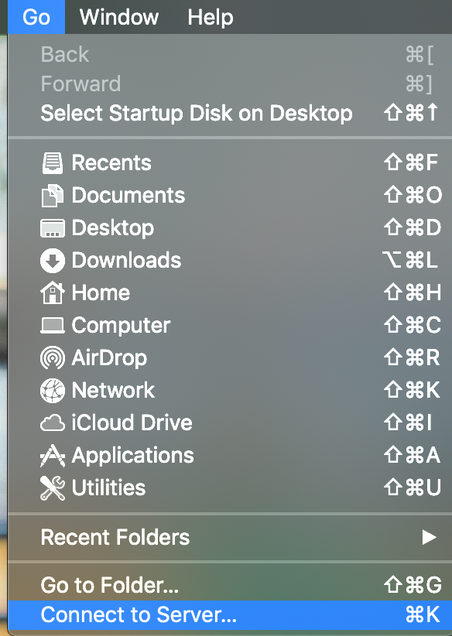
Open “Connect to Server”. A nice keyboard shortcut to do this is “Command + K”:
To map a network drive in OS X:
1. In the Finder, open the the “Connect to Server” dialog by clicking Go->Connect to Server (or by using the hotkey Command+K)
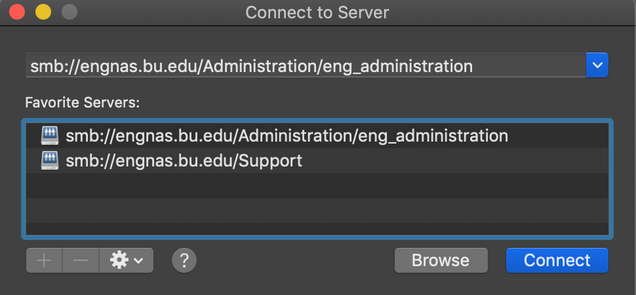
2. Type in path to network drive (see table below)
| Drive Letter | Address |
| V | smb://engnas.bu.edu/courses |
| W | smb://engnas.bu.edu/administration/eng_administration OR smb://engnas.bu.edu/administration/pho_administration |
| U | smb://engnas.bu.edu/research |
| X | smb://engnas.bu.edu/users/<1st_Letter>/<2nd_Letter>/<username> Example: user patsmith is: smb://engnas.bu.edu/users/p/a/patsmith |
| N | smb://engnas.bu.edu/support |
3. Click on the “+” to save the entry
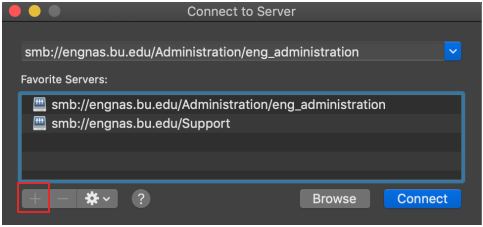
4. Click connect

5. In the new dialog, enter your BU credentials as: ad\BUusername and your Kerberos password. Click “OK”. Note that you should replace “BUusername” with your own BU username. Click “Connect”
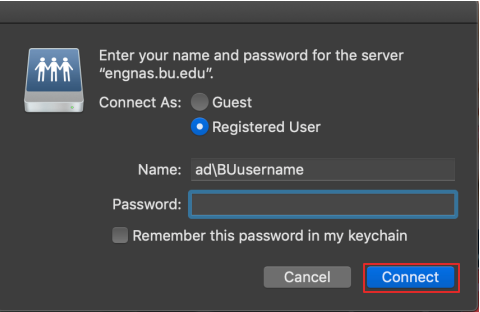
Note you will be asked to fill in your authentication information every time you connect to a server
If you would like to add a shortcut to the network drive to your desktop:
- After you have mounted the network drive, open the share in finder.
- Find the subfolder you wish to have an alias.
- Hold option command and drag that folder to your desktop to create an alias.
If you are mounting the W or V drives (which contain separate container volumes which hold more specific volumes like research shares or department administration shares), you will need to modify the path to the alias, so that it reconnects correctly after a reboot.
- With the share still mounted, right click the alias and select Get Info.
- Under General click Select New Original
- In the window that opens select engnas.bu.edu under Shared
- Select the next level (Administration, Research, Users).
- Select the next level (eng_administration, your particular research share or the first letter of your username).
- Continue to select folders until the full path to the folder you wish to alias is mapped out, and hit open.
- Your alias will now be able handle a reboot.
Linux
All Linux Systems
Mount with SSHFS
SSHFS is the Secure SHell FileSystem. You can install it easily on most Linux. For Ubuntu run:
$ sudo apt install -y sshfs
For RHEL based systems, run:
$ sudo yum install -y sshfs
With sshfs installed, mount the share as follows:
sshfs -o workaround=rename username@eng-grid4.bu.edu:/ad/eng/<share> /<mountpoint>
For example:
The mount point needs to exist, so the first time you may need to create it.
$ mkdir /home/mine/U
Now mount the share to the mount point.
$ sshfs -o workaround=rename username@eng-grid4.bu.edu:/ad/eng/research/eng_research_mylab /home/<username>/U
the “workaround=rename” option is recommended to ensure that certain programs, such as Subversion, work properly.
If you get an error about not having permissions to run fusermount, you need to make it executable:
sudo chmod +x /bin/fusermount
Sometimes you need to unmount a share/directory
fusermount -u /home/<username>/U
or if this fails
sudo umount -l /home/<username>/U
AD-joined Linux Systems
Once your machine is joined to AD, you should add the mountpoints that you use frequently to your /etc/fstab file so that they will mount automatically on bootup. At the very least, ENG users should run:
$ mkdir -p /ad/eng/users
$ mkdir /ad/eng/support
$ mkdir /ad/eng/research
and then add the following lines to your /etc/fstab exactly as shown. Note that these lines may have line-wrapped on your screen to two lines, but make sure that each is truly only one line when you enter it into your fstab:
engnas.bu.edu:/Courses/ /ad/eng/courses nfs vers=3,rw,tcp,soft,sec=krb5,nolock,intr,noacl,rsize=8192,wsize=8192,noatime 0 0
engnas.bu.edu:/Administration/eng_administration /ad/eng/administration nfs vers=3,rw,tcp,soft,sec=krb5,nolock,intr,noacl,rsize=8192,wsize=8192,noatime 0 0
engnas.bu.edu:/Research/ /ad/eng/research nfs vers=3,rw,tcp,soft,sec=krb5,nolock,intr,noacl,rsize=8192,wsize=8192,noatime 0 0
engnas.bu.edu:/Users/<firstLetterofUsername>/secondLetterofUsername>/<username> /ad/eng/users nfs vers=3,rw,tcp,soft,sec=krb5,nolock,intr,noacl,rsize=8192,wsize=8192,noatime 0 0
Quota Limits on Network Drives
If you find that ENG GRID jobs that write large amounts of data, such as Cadence simulations, are failing inexplicably, check if you’re out of space in your home directory. Note that the X: (/ad/eng/uses/u/s/username) drive has a hard quota limit of 10GB per user and cannot be updated. If your lab has a research share (/ad/eng/research), it is recommended that you put large amounts of data here instead.
Note that large amounts of data are often included beneath dotfile directories (those that start with a ‘.’) which may just be full of unneeded temporary data. For example, COMSOL stores a lot of state data in .comsol. You can speedup computations and reduce crashes by moving the recovery and workspace directories.
On Linux systems with the AD drives mounted, such as on lab machines or on eng-grid, you can check your quota usage by running “quota -s“. On Windows, you should right-click on the top-level of your home directory and choose “properties”, and your drive usage will be calculated (this may take a while as it counts up).