
My CV User Guide – Faculty Annual Report
1. My CV Introduction
This User Guide provides details for navigating to, reviewing and adding to your Faculty Annual Report (FAR) in My CV. There are additional User Guides for other functionality, such as navigating and modifying your profile, scholarly and creative works, teaching activities and professional activities (service). These can be found on the Training and Support page of the My CV Project Website.
Overview – Faculty Annual Report (FAR)
The Faculty Annual Report is an exercise to capture and review faculty activity information from the past calendar year.
Eligible activities (scholarly and creative works, grants, teaching activities, and professional activities) from your My CV profile will automatically pull onto your FAR report. You will need to provide some additional information (overall comments, leaves, advising, and works in progress) within the FAR itself.
Annual reports will then follow a chain of review, according to the internal processes of each school/college, before final submission to the Office of the Provost.
2. Accessing My CV
3. Review Your Profile
Before beginning your Faculty Annual Report, please review your My CV profile. Eligible items from your My CV profile (scholarly and creative works, grants, teaching, professional activities) will automatically pull onto your report. Other information (summarizing comments, leaves, advising, works in progress) will be entered within the FAR itself.
The following information will be automatically pulled from your My CV profile:
- Teaching Activities: Teaching activities on your My CV profile with dates from last calendar year.
- Scholarly and Creative Works: Scholarly and creative works items on your My CV profile with publication dates or online publication dates from last calendar year. You may add accepted or in progress items with publication dates after last year under “Works in Progress.”
- Honors/Distinctions: Distinction/award items on your My CV profile with dates from last calendar year.
- Internal/External Service: Professional activities items on your My CV profile with date ranges that include last calendar year. For existing items, you may need to edit the record to select the “Internal (BU)” or “External (non-BU)” service option, so the activity is added to the correct section.
- New/Continuing Grants: Grants on your My CV profile with date ranges including last calendar. Those with start dates of last year will pull in as “New Grant Funding,” and those with start dates before last year will pull in as “Continuing Grants.”
- New Grant Proposals: Grant proposals on your My CV profile with proposal submission dates from last calendar year.
4. Navigation
Accessing your FAR
You can access your FAR in My CV in one of two ways.
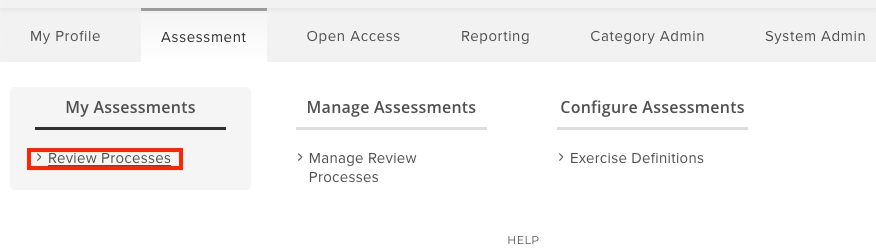
1) You can access your FAR through the Menu Tab.

Navigate to Menu > My Assessments > Review Processes
2) You can access the FAR from the My Actions carousel on the home page.
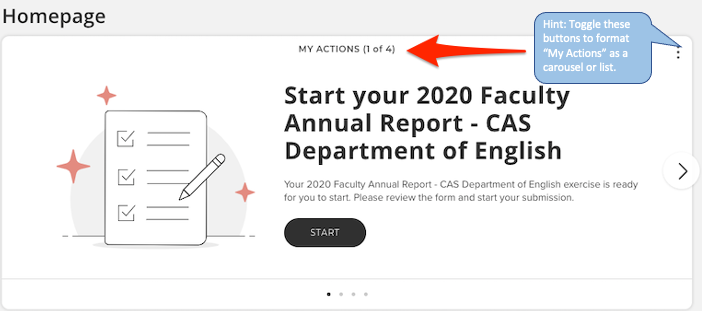
Select the Faculty Annual Report. The name of the report will be specific to either your college or department.
4.2 Start Page
You will be brought to the FARIntroduction Page , which contains basic instructions. To begin your FAR, click Next.
5. Begin Your FAR
General
Provide overall comments for your FAR, report your tenure status, and report any leaves/sabbaticals from the past calendar year.
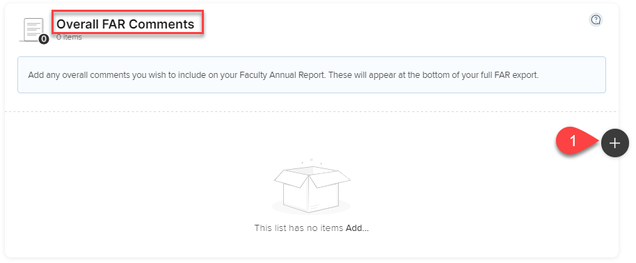
Overall FAR Comments
Add any overall comments you wish to include on your Faculty Annual Report. These will appear at the bottom of your full FAR export.
Add Overall Comments
- In the Overall FAR Comments section, click the Add Item button
- Write an overall comment in the Overall FAR Comments text box
- Click the Save and Exit button

Edit Overall Comments
- To edit a comment, click the pencil icon

- Make the changes needed within the Overall Far Comments text box
- Click the Save and Exit button
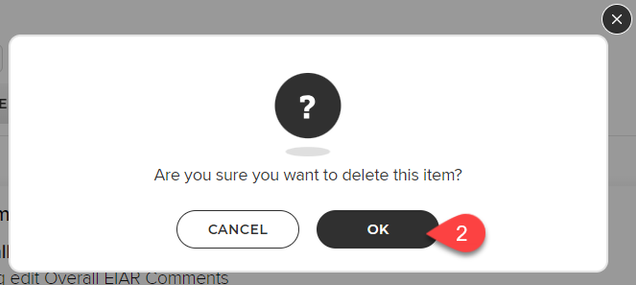
Delete Overall Comments
- To remove a comment, click the trash can icon

- You will get a pop-up: “Are you sure you want to delete this item?” Click OK

Tenure Status
Add Tenure Status
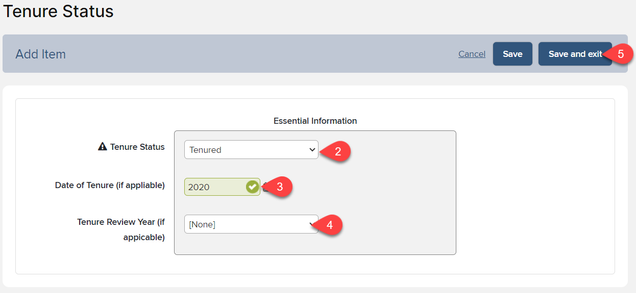
- In the Tenure section, click the Add Item button

- In the Tenure Status field, click the [Select an Option] drop-down list to choose the appropriate status
- If you’re tenured, type the date in the Date of Tenure (if appliable) field in the following formats 14 Mar 2001 OR Mar 2001 OR 2001
-
- Note: If you choose to use the calendar icon, the following is required:
- Click the calendar icon
- Select the month
- Select the year
- Click on the day

- Note: If you choose to use the calendar icon, the following is required:
-
- In the Tenure Review Year (if applicable) field, click the drop-down list to choose the review year
- Click the Save and Exit button
Edit Tenure Status
- To edit tenure status, click the pencil icon

- Make the changes needed
- Click the Save and Exit button
Delete Tenure Status
- To remove tenure status, click the trash can icon

- You will get a pop-up message “Are you sure you want to delete this item?” ClickOK
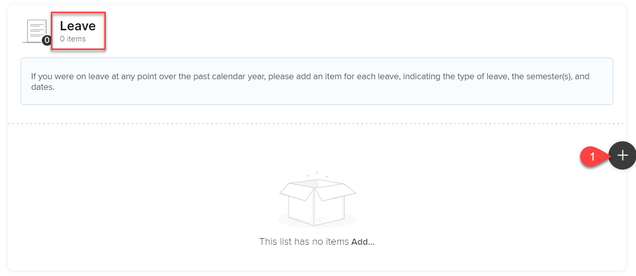
Leave
Add Leave
- In the Leave section, click the Add Item button
- Enter leave information:
-
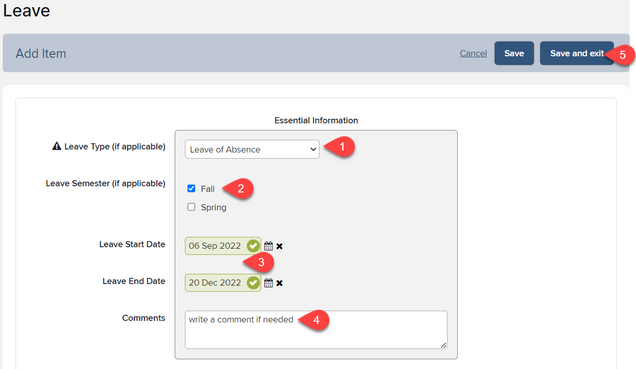
- In Leave Type (if applicable) field, Click the drop-down list to choose the appropriate option
- In Leave Semester (if applicable) field, select Fall and/or Spring
- Enter the Leave Start Date and Leave End Date. Make sure to type the date in the following formats 14 Mar 2001 OR Mar 2001 OR 2001
-
- Note: If you choose to use the calendar icon, the following is required:
- Click the calendar icon
- Select the month
- Select the year
- Click on the day

- Note: If you choose to use the calendar icon, the following is required:
-
- Add Comments
- Click the Save and Exit button
-
Edit Leave
- To edit Leave, click the pencil icon

- Make the changes needed
- Click the Save and Exit button

Delete Leave
- To remove the Leave, click the trash can icon

- You will get a pop-up saying “Are you sure you want to delete this item?” Click OK
6. Teaching and Advising
Teaching and Advising
Add your teaching items to the Teaching Activities list below and an item to the Advising list to report your advising activity. You may include general comments about your teaching and advising under “Supporting Information.”
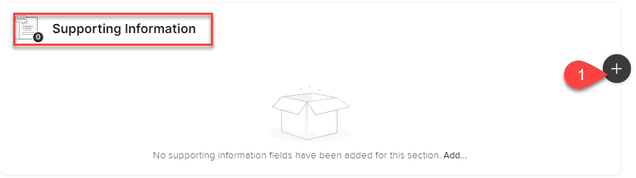
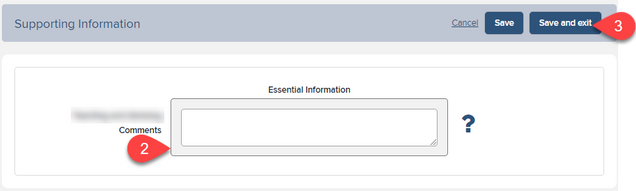
Supporting Information
Add Supporting Information
- In the Supporting Information section, click the Add Item button
- Write your comment(s) in the Comments text box
- Click the Save and Exit button
Edit Supporting Information
- To edit, click the pencil icon
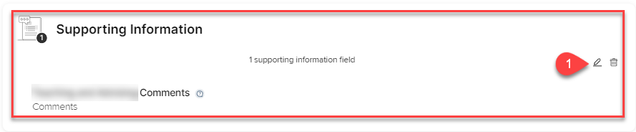
- Make the changes needed within the Comments text box
- Click the Save and Exit button
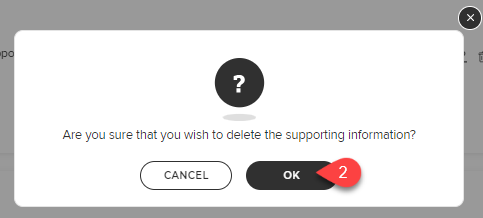
Delete Supporting Information
- To remove it, click the trash can icon
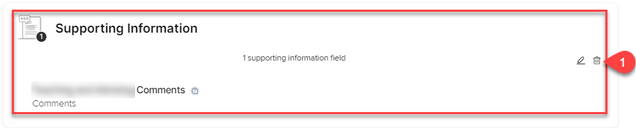
- You will get a pop-up: “Are you sure you wish to delete the supporting information?” Click OK
Teaching Activities
Select teaching activities (courses taught, courses developed, and other teaching activities) from the past calendar year to associate with your report. Eligible teaching items will be prepopulated when you begin your FAR. You may also add/remove items as necessary.
Add Teaching Activity Manually
- In the Teaching Activities section, click the Add Item button.

- Click the Add New Teaching Activity button.

- Select the activity type and fill out the necessary information about the activity, then click Save.
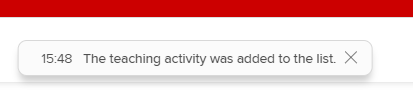
- You will see a message at the top of the page confirming that the activity was added to the list
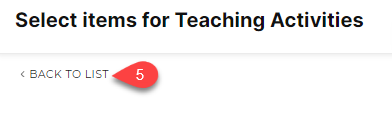
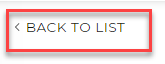
- Click Back To List
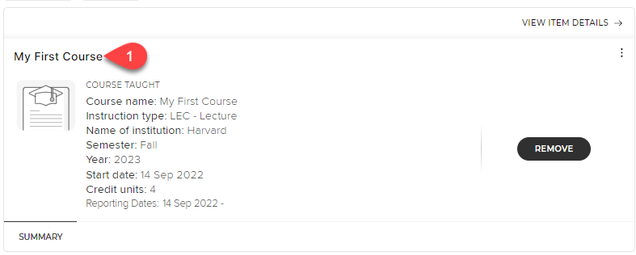
Edit Teaching Activity
- Click the Title of the Teaching Activity
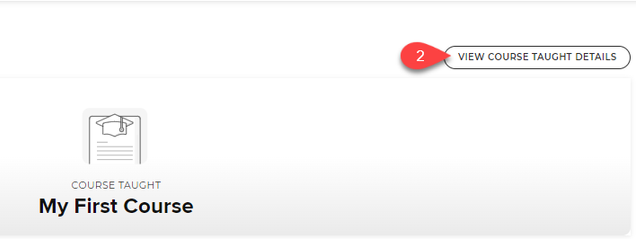
- Click View Course Details button
- Under Data Sources section, click the pencil icon
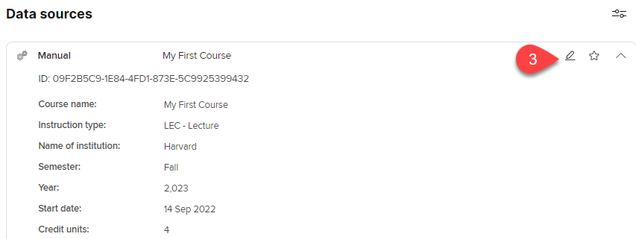
- Make the desired changes, then click Save
Remove Teaching Activity from the List
- If you do not wish for a particular activity to appear in your report, click Remove
Advising
Add Advising Activity
- Under the Advising section, click Add Item
- Fill out the form with the requested information
- Click the Save and Exit button
Edit Advising Activity
- Under the Advising section, click the pencil icon to edit activity
- Make the desired changes, then click the Save and Exit button
Delete Advising Activity
- If you do not wish for a particular activity to show up in your report, click Remove.
7. Scholarly & Creative Works
Scholarly & Creative Works
Supporting Information
Add Supporting Information
- In the Supporting Information section, click the Add Item button
- Write your comment(s) in the Comments text box
- Click the Save and Exit button
Edit Supporting Information
- To edit, click the pencil icon
- Make the changes needed within the Comments text box
- Click the Save and Exit button
Delete Supporting Information
- To remove it, click the trash can icon
- You will get a pop-up: “Are you sure you wish to delete the supporting information?” Click OK
Scholarly & Creative Works
Add Scholarly & Creative Works Manually
- In the Scholarly & Creative Works section, click the Add Item button
- Click the Add New Scholarly & Creative Work button at the top right side of the page
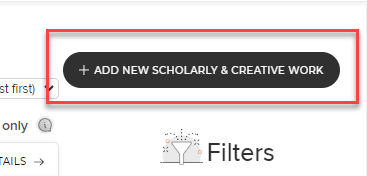
- Select the type of the work and fill out the necessary information about the work
a. The Scholarly and Creative work will be automatically added to your list - Click the Back To List hyperlink at the top right side of the page
Edit Scholarly & Creative Works
- Click the Title of the scholarly and creative work
- Click the View Book Details button

- Under the Data Sources section, click the pencil icon
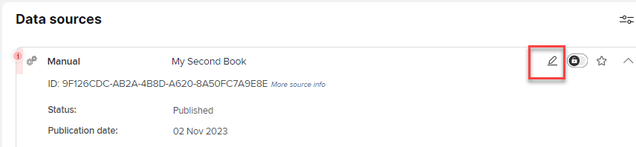
- Make the desired changes, then click Save
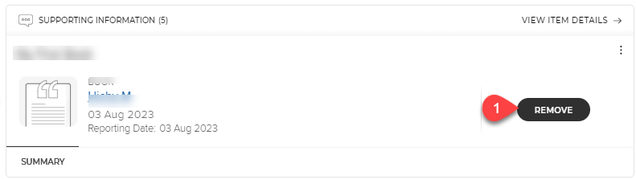
Remove Scholarly & Creative Works
- If you do not wish for a particular activity to appear in your report, click Remove
Works in Progress
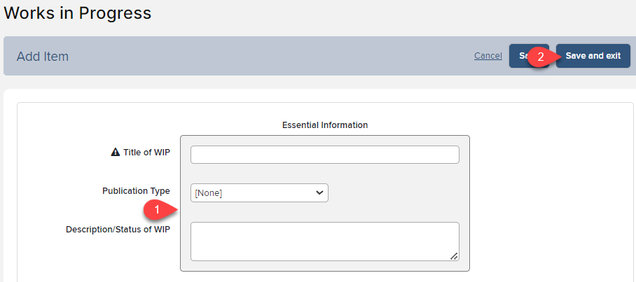
Add Works in Progress
- In the Works in Progress section, click the Add Item button.
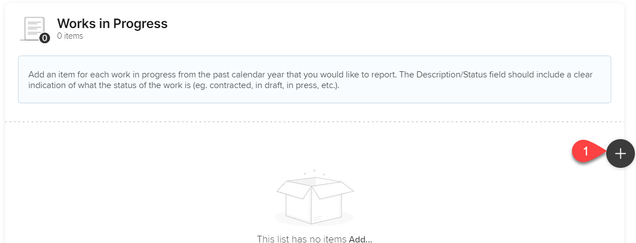
- Fill out the requested information about WIP
- Click the Save and Exit button
Edit Works in Progress
- Under the Works in Progress section, click the pencil icon to edit the activity
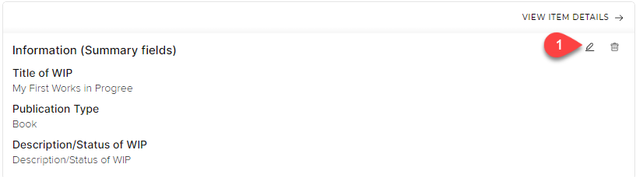
- Make the desired changes, then click the Save and Exit button
Delete Works in Progress
- If you do not wish for a particular activity to appear in your report, click Remove
8. Professional Activities: Distinctions & Awards And Internal vs. External
Professional Activites
Supporting Information
Add Supporting Information
- In the Supporting Information section, click the Add Item button
- Write your comment(s) in the Comments text box
- Click the Save and Exit button
Edit Supporting Information
- To edit, click the pencil icon
- Make the changes needed within the Comments text box
- Click the Save and Exit button
Delete Supporting Information
- To remove it, click the trash can icon
- You will get a pop-up: “Are you sure you wish to delete the supporting information?” Click OK
Distinctions and Awards
Add Distinctions and Awards Manually
- In the Distinctions and Awards section, click the Add Item button
- Click the Add New Distinction Awards button at the top right side of the page
- Fill out the necessary information about the activity
a. The Distinction/Award will be automatically added to your list - Click the Back To List hyperlink at the top right side of the page
Edit Distinctions and Awards
- Click the Title of the Distinction/Award
- Click the View Distinction/Award Details button
- Under the Data Sources section, click the pencil icon
- Make the desired changes, then click Save
Remove Distinctions and Awards
- If you do not wish for a particular activity to appear in your report, click Remove
Internal and External Service
Add Internal and External Service Manually
- In the Internal and External Service section, click the Add Item button.
- Click Add New Professional Activity button at the top right side of the page
- Fill out the necessary information about the activity
a. The activity will be automatically added to your list - Click the Back To List hyperlink at the top right side of the page
Edit Internal and External Service
- Click the Title of the activity
- Click the View Details button at the top right side of the page
a. The name of the button changes depending on the type of activity. Meaning if you are editing a Committee membership activity, the button will be labeled View Membership – Committee Details. - Under the Data Sources section, click the pencil icon
- Make the desired changes, then click Save
Remove Internal and External Service
- If you do not wish for a particular activity to appear in your report, click Remove
9. Grants: Funding and Proposals
Grants
Supporting Information
Add Supporting Information
- In the Supporting Information section, click the Add Item button
- Write your comment(s) in the Comments text box
- Click the Save and Exit button
Edit Supporting Information
- To edit, click the pencil icon
- Make the changes needed within the Comments text box
- Click the Save and Exit button
Delete Supporting Information
- To remove it, click the trash can icon
- You will get a pop-up: “Are you sure you wish to delete the supporting information?” Click OK
Grant Funding
Add Grant Funding Manually
- In the Grant Funding section, click the Add Item button
- Click the Add New Grant button at the top right side of the page
- Select the grant type , and fill out the necessary information about the activity
a. The grant will be automatically added to your list - Click the Back To List hyperlink at the top right side of the page
Edit Grant
- Click the Title of the grant
- Click the View Grant Details button
- Under the Data Sources section, click the pencil icon
- Make the desired changes, then click Save
Remove Grant
- If you do not wish for a particular activity to appear in your report, click Remove
New Grant Proposals
Add New Grants Proposals Manually
- In the New Grant Proposals section, click the Add Item button
- Click the Add New Proposal button at the top right side of the page
- Fill out the necessary information about the activity
a. The proposal will be automatically added to your list - Click the Back To List hyperlink at the top right side of the page
Edit Grant Proposals
- Click the Title of the activity
- Click the View Details button
- Under the Data Sources section, click the pencil icon
- Make the desired changes, then click Save
Remove Grant Proposals
- If you do not wish for a particular activity to appear in your report, click Remove
10. Review, Download, and Submission
Review and Submission
Download Your FAR
- On the left navigation page, click the Download button
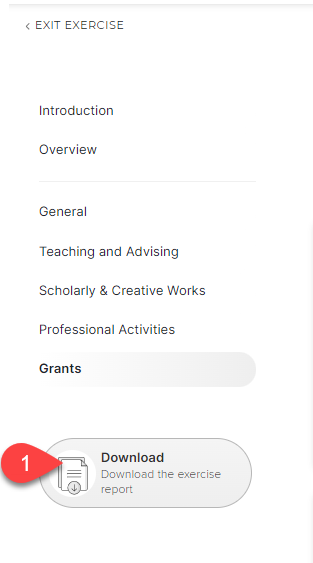
- Select the style you want to view your report as
- Click Download

Submit for Review
- To submit your FAR, click the Submit button at the top right corner of the page
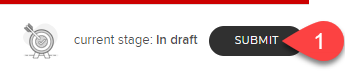
- Review the summary page and address any issues that might be displaying under each section
- Check off the “I confirm that my FAR is complete, accurate, and ready for review.” checkbox
- Click Confirm

- You will see a message on the page stating the Review Process moved to the next stage. If you want to edit the FAR, click the EDIT button.

11. Additional Resources
More information about My CV, including contact information for your My CV Liaisons, additional User Guides and Frequently Asked Questions, can be found on the My CV Project Website.