
MY CV – Scholarly and Creative Works User Guide
1. My CV Introduction
This User Guide provides details for navigating, modifying and depositing your Scholarly and Creative Works in My CV. There are additional User Guides for other functionality, such as navigating and modifying your profile, grants, teaching activities, and professional activities.. These can be found on the Training and Support page of the My CV Project Website.
2. Accessing My CV
3. Navigation
3.1 Menu Tab
Use the tabs across the top to navigate My CV.
The Menu tab allows navigation to the different modules where you can manage your scholarly and creative works, grants, professional activities, or teaching activities. You can also build a CV or report, explore scholarly and creative works and activities of other BU users, or manage your profile and search settings.

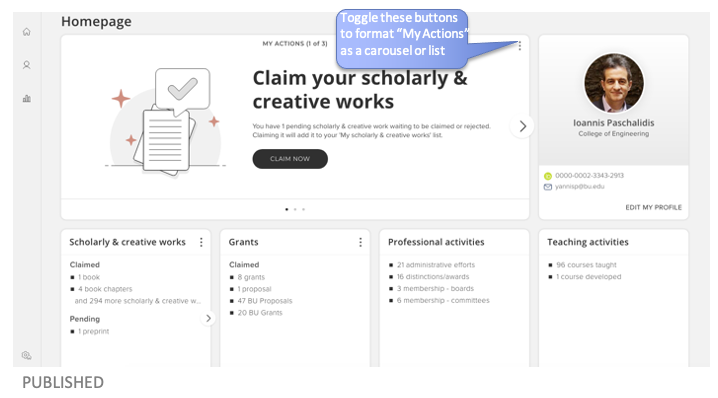
3.2 Home Page
The Home page allows you to see a summary view of the information you have in My CV as well any outstanding actions you may need to take, including scholarly and creative works you must claim or reject, and scholarly and creative works you must deposit into OpenBU. These outstanding actions are displayed by browsing your My Actions carousel. If you prefer a list of your actions, you can change the display format, by clicking the buttons pointed out with the blue callout box below.
3.3 Scholarly and Creative Works Page
The My CV Scholarly and Creative Works Module (previously called Publications Module) is used to collect and aggregate your scholarly and creative works. The module includes a built-in tool that searches a set of external data sources including arXiv, PubMed, RePEc, SSRN for scholarly and creative works that belong to you, based on your (editable) search settings. The search tool will looks for scholarly and creative works that belong to you on a regular basis and therefore your scholarly and creative works list will be continually updated. When new scholarly and creative works are found, you will receive an email notification.
In addition to the automatically gathered scholarly and creative works, you also have the option to edit and create new scholarly and creative works.
Navigate to your scholarly and creative works page by clicking Menu > My Profile > My Work > Scholarly and Creative works.
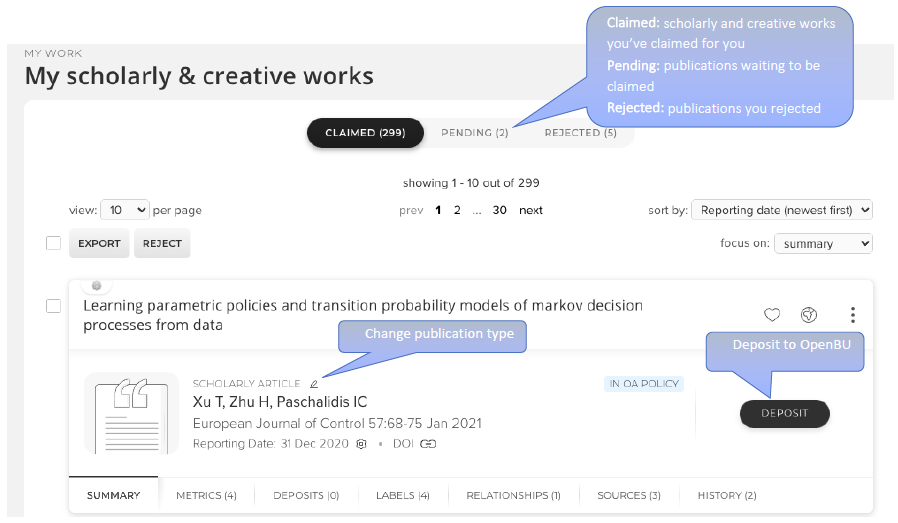
On the Scholarly and Creative Works page, you can view a list of your publication records in My CV. From here you can:
- View scholarly and creative works under Claimed, Pending and Rejected
- Change the publication type for any of your records
- View your detailed publication record
- Deposit scholarly and creative works to OpenBU
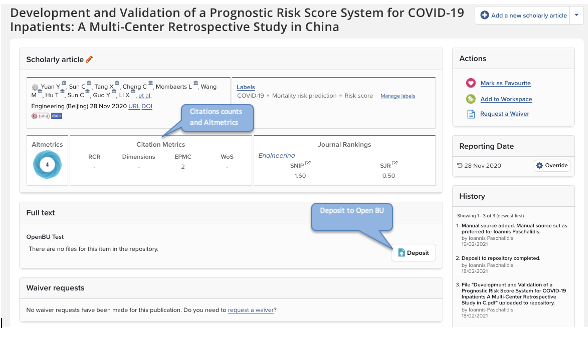
3.4 Detailed Record View
To get to the detailed publication record view, click the title of the work in your queue. The detailed view shows you all of the data available for your record. From here you can:
- Edit the record data
- Important note: If the record was automatically harvested from an external publication source, many fields will be locked for editing. Jump to the Editing automatically found scholarly and creative works section of this guide for more details.
- Add/edit labels (including a label for peer review)
- Deposit record to OpenBU, satisfying a BU Opt-Out Open Access Policy requirement
- Add/edit BU authors
- View multiple data sources and set a preferred record
- Link to other scholarly and creative works, grants, or professional activities
- View the history of your record
- Create, edit, or delete links to other scholarly and creative works, grants, professional activities, or teaching activities

4. Search Settings
Having the optimal search settings is very important in My CV. This user guide covers modifying search settings at a high level, for more information see the “Quick Reference – Refining Scholarly and Creative Works Queue” guide on the Office of the Provost Training and Support page for My CV.
My CV will automatically search a select list external databases for your scholarly and creative works, potentially saving you from having to enter the data yourself. When matches are found, you will receive an email asking you to login and claim or reject the scholarly and creative works.
Your search settings are initially set to your last name and initial(s). If you have a common name, according to U.S. Census data, you will also have “Boston U”, “Boston Univ” and “Boston University” as a default search setting. It is likely that you will want to refine your search settings to achieve more meaningful results from the automated searches including more matches and fewer false positives.
Please note that there is a 30-minute delay in new searches after you have changed your search settings.
Changes in search settings will not affect already pending scholarly and creative works. If you would like your pending publication queue to be cleared so that a new search with refined search settings can be run, please contact your My CV Liaison.
If you need any assistance, advice or support in refining your search settings, please contact BU Libraries (using the email address disc@bu.edu).
4.1 Modify Name-based Search Settings
Search settings include name variants, addresses, keywords such as Boston University, and online database IDs.
When modifying search settings, it is important to keep in mind that configuring additional search settings may limit your search, rather than expand it. For example, if, in addition to your name, you have an address, a start date, and a keyword, your search will be limited to only those scholarly and creative works that meet ALL of those criteria. Keep this in mind when adding more settings.
On the other hand, you can include multiple search terms within one search setting to expand your search. For example, if you enter three name variants, your search will retrieve scholarly and creative works associated with any one of the name variants.
To modify your name-based search settings:
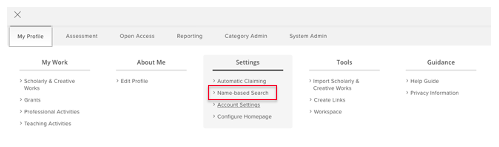
a) Click the Menu tab from the navigation panel, then under My Profile > Settings select Name-based search.
Type the name-based search terms you wish to add in the relevant textboxes. Click the green plus sign (![]() ) to add.
) to add.
- Name variants: Use the format “Last name First name” or “Last name Initials”. Do not use punctuation.
- Addresses: Add the names of institutions/organizations at which you have published. Do not add street addresses or email addresses.
- Hint: If you have many scholarly and creative works in arXiv, it is recommended that you do not enter an address and instead use an arXiv identifier (see “author identifiers” below).
- Start date: The date you first began publishing.
- Keywords: Add any relevant keywords that may help refine which scholarly and creative works are found for you. Keywords should be used sparingly.
- Journals: Add the names of journals in which you publish most frequently. Journal search settings should be used sparingly.
- Specific article IDs: Specific article IDs can be used to retrieve individual articles that can’t be harvested using name-based search settings.
- Article ID: All the available databases have a system of identification codes for their online records, and these can be found via their web interfaces and then entered into this text box.
- Online database IDs: Select the appropriate database from the drop-down menu after entering the Article ID in the text box. Save the search settings when you are finished entering IDs.
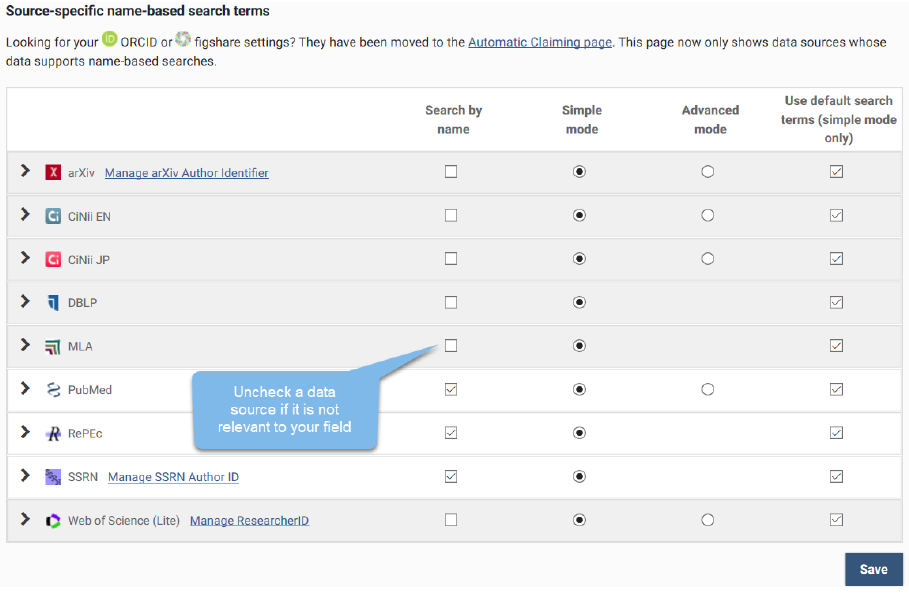
4.2 Activate and Deactivate External Sources
Some external sources of scholarly and creative works may not be relevant for you. To prevent My CV from searching those sources by name, and potentially producing false positives, you can choose to deactivate the automatic search functionality.
To do this, simply uncheck the box next to the respective source and click Save.
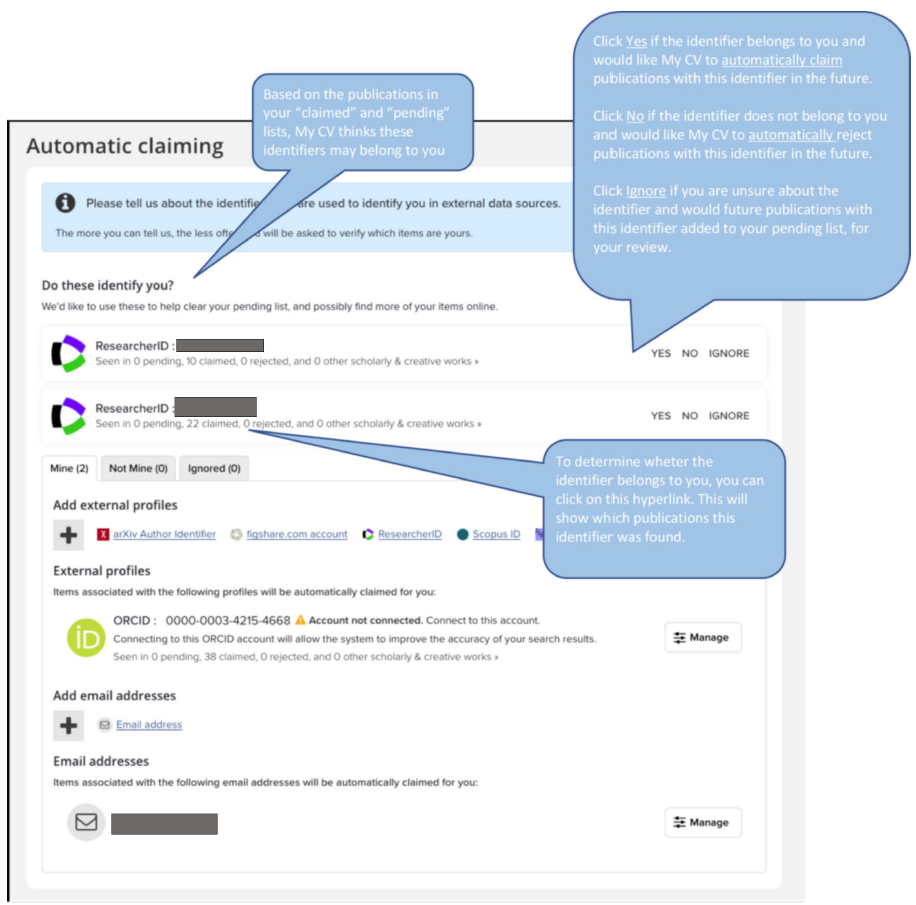
4.3 Modify Automatic Claiming Settings
My CV can determine different identifiers that might belong to you based on search settings already in the system and an algorithm that looks for identifiers associated with your harvested scholarly and creative works. Author identifiers can be email addresses, ORCID accounts, Researcher IDs.
Claiming an identifier can save you a significant amount of time, because when My CV finds a publication with the same identifier in the future, it will automatically claim that publication for you.
Search settings can be configured to use author identifiers and external profiles for different available databases or additional email addresses to automatically retrieve documents that have been tagged by the database provider.
To modify your source-specific name-based search terms:
a) Click the Menu tab from the navigation panel, then under My Profile > Settings select Automatic claiming.
- Review any data sources under the “Claimed?” section if applicable.
- Add author identifiers and external profiles: ArXiv, figshare, ORCID, ResearcherID, Scopus and SSRN offer the option of entering author identifiers that will automatically retrieve documents that have been tagged by the database provider. Click on the small plus symbol (+) beside the database name.
A box will open where you can enter your search identifier for that specific database.
-
- For ArXiv, Scopus, and SSRN, the identifier can be found by searching for the author in the user interface.
Web of Science uses an identifier called ResearcherID and can sometimes be found in Web of Science records, but a more reliable source is the ResearcherID website (www.researcherid.com).
5. Link your ORCID
If you already have an ORCiD, adding it to your My CV account will save you time. If you do not already have one, you don’t need to complete the steps outlined in the instructions below.
Adding your ORCiD to your My CV account ensures that any publications tied to this ID are pulled into My CV in an already claimed state. This eliminates the need to claim or reject these publications.
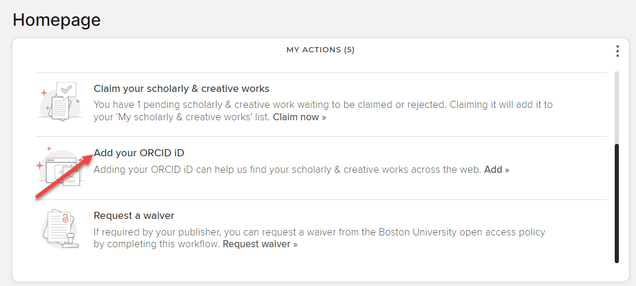
- Adding your ORCiD can be done from the Home Page, within your My Actions carousel or work list. In the work list, click Add your ORCiD ID.
- Follow the instructions on the page to enter your Email or iD and ORCiD Password.
- If you have forgotten your ORCiD password, you can request it to be reset by going to this address: https://orcid.org/reset-password .
- Click Authorize.
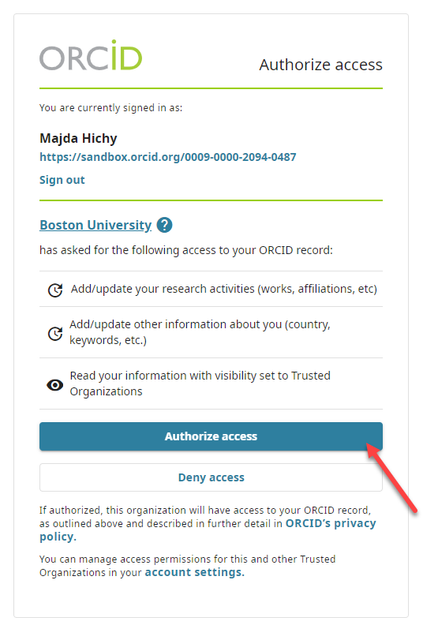
- Your ORCiD will now be tied to your My CV account.
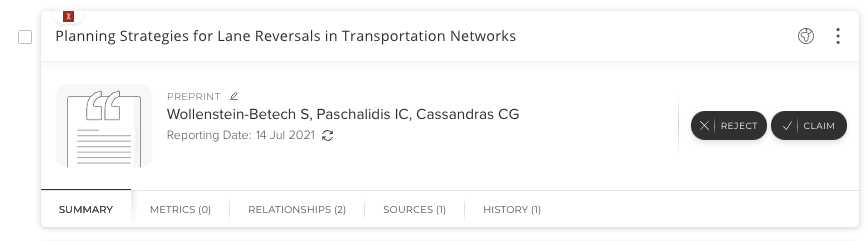
6. Claim or Reject Pending Publication
When My CV finds a potential publication for you, you will be sent an email asking you to log in to either claim or reject it.
Once you log in, the home page will indicate you have pending scholarly and creative works in your My Actions carousel or work list.
a) Click the Claim scholarly and creative works button.

b) You will be taken to the Pending tab of your My scholarly and creative works page.
c) Either select Claim as Mine or Reject (not mine) next to each pending publication, or select multiple items to claim and reject in bulk.
7. Import Scholarly and Creative Work in Bulk
Not all scholarly and creative works are going to be found through the searches of the external data sources. You can import a Reference Manager/Endnote or BibTex file of your publication records into My CV.
A BibTex or EndNote file can be created from your Google Scholar Citation profile. Once you have a file to import, perform the following steps:
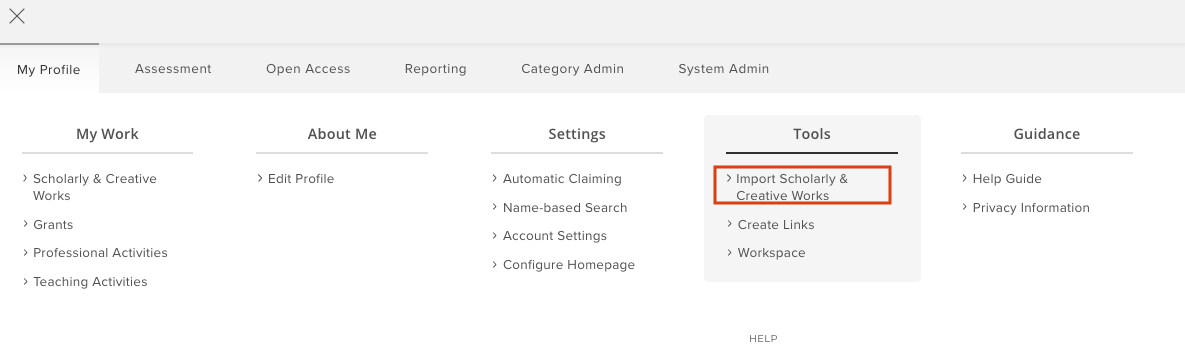
a) From the Menu tab navigate to My Profile > Tools select Import Scholarly & Creative Works
b) Click Browse and select the file you wish to upload.
c) Select the File Type you are uploading (either Reference Manager/Endnote or BibTex).
d) Click Upload.

e) My CV will compare the records you are uploading with those already in the system and present you with some options.
i. For records that match existing scholarly and creative works, it is recommended that you select Do not import. This will prevent duplication or potentially rewriting more complete data.
f) Once you’ve selected Do not import on any matching records, click Import at the bottom of the screen.
i. Once you have imported your publication records, you will be able to edit them as you would any other manual record. You will need to select a status for each record, as they will display as unpublished items.
8. Add a Scholarly or Creative Work Manually
Not all scholarly and creative works are going to be found through the searches of the external data sources. There are two ways you can manually add any missing scholarly and creative works.
a) From your Home screen, click the + add new button within the Scholarly and Creative works summary box.

Alternatively, from your Scholarly and creative works page, click the add a new scholarly and creative works button.

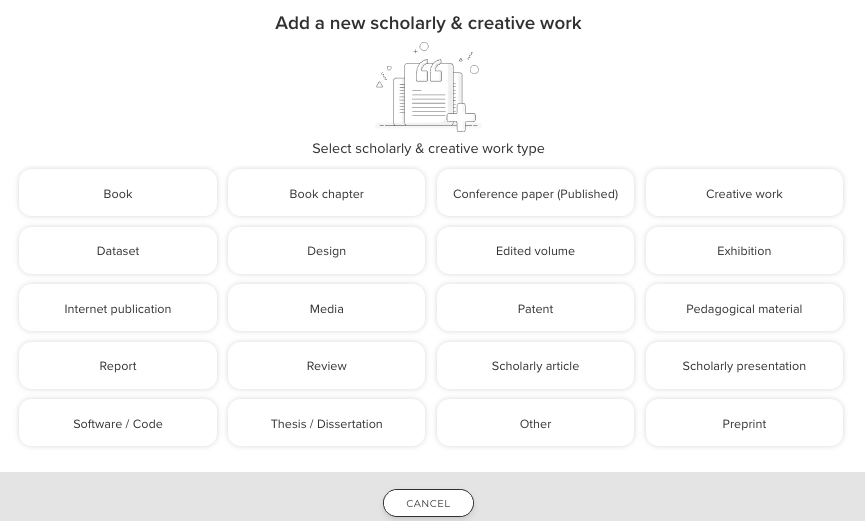
b) If you are adding a new publication, select which type you are adding from the pop up screen*
c) You will be taken to the Assisted Entry screen. Enter the title (or DOI / ISBN number if you are adding a journal article or book/book chapter) and click Search.
*The availability of certain types of scholarly and creative works varies by school/college.
8.1 If My CV Finds Your Publication in Assisted Entry
a) Click Claim beside your publication.
b) My CV will bring you to a confirmation page.
c) If this publication falls within BU’s Open Access Policy, click Deposit your publication from the confirmation page. If you miss or skip this step, you will be prompted to deposit at a later time.
For information on depositing to OpenBU, refer to Deposit to OpenBU section (Section 9) of this user guide.

8.2 If My CV Doesn’t Find Your Publication in Assisted Entry
a) Click Go to next step.

b) Fill in the publication information. Fields marked with a red asterisk are required for completion.
c) Save the record.
d) My CV will bring you to a confirmation page.
e) If this publication falls within BU’s Open Access Policy, click Deposit your publication from the confirmation page. If you miss or skip this step, you will be prompted to deposit at a later time.
For information on depositing to OpenBU, refer to Deposit to OpenBU section (Section 9) of this user guide.
9. Edit Existing Publication Records
You can edit data in publication records in one of two ways depending on whether the record is
manual, or was sourced online by the system.
9.1 Editing Manual Records
a) Open the detailed view of the record for the publication you wish to change.
b) Click the Edit record button (![]() ) located in the Data sources section
) located in the Data sources section
c) Save changes once you are finished.
9.2 Editing Automatically Found Records
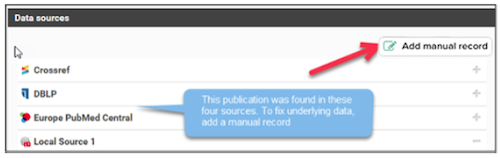
You cannot directly edit the data from records that come in from one of the online databases. To make corrections you instead create a manual record to supplement the one that already exists.
a) Open the detailed view of the record for the publication you wish to change.
b) Click the Add manual record button. (![]() )
)
c) The data entry screen will be automatically populated with the online record’s data for you to edit.
d) Save changes once you are finished.
8.3 Set Preferred Records
Some scholarly and creative works will be found in multiple external sources. You have the ability to set a preferred record, if the underlying data from one external source is superior to the others. This will impact how the publication is displayed on your My Scholarly and Creative Works page.
a) Open the detailed view of the record for the publication you wish to change.
b) Review each of the sources for the publication data, by clicking the plus sign next to each occurrence.
c) Next to the source with the preferred underlying data, click Set as preferred record*.
*Manual records for scholarly and creative works with multiple sources are always the preferred record unless action is taken to set a different source using the steps above.

8.4 Manage Duplicate Records
My CV’s automatic search mechanism has an advanced deduplication algorithm, but some duplicates may appear in your scholarly and creative works queue. To remove these, you must merge the records.
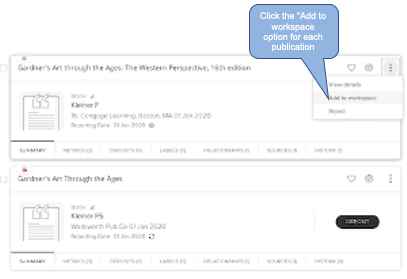
a) Navigate to your claimed scholarly and creative works queue (“Claimed” tab):
i. For the first occurrence of the publication that is duplicated, click the Add to workspace option.
ii. For the other publication that is duplicated, also click the Add to workspace option.
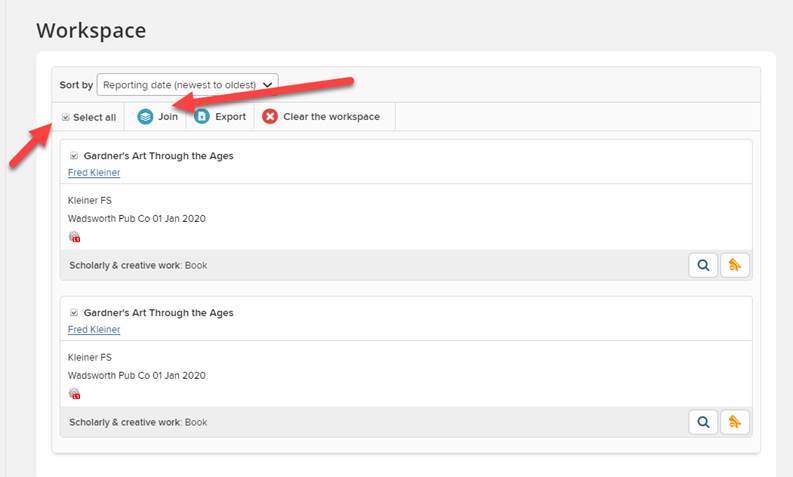
b) Navigate to your workspace: Menu > My Profile > Tools > Workspace

c) In the workspace, select the check mark next to the scholarly and creative works that you’d like to join
d) Click Join.
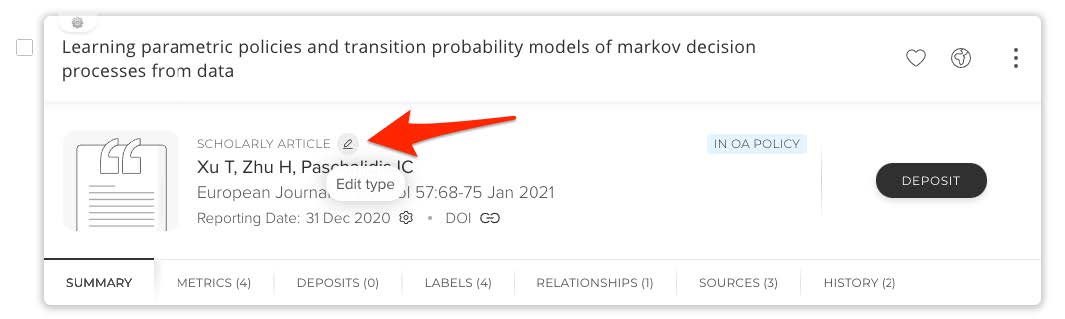
8.5 Change Publication Type
If your publication was automatically pulled into My CV with the wrong publication type, you can easily change it at any time.
- Navigate to your claimed scholarly and creative works queue (“Claimed” tab)
- Click the pencil icon next to the publication type ( )
- Select the correct publication type from the drop down list
- Click Save
Click image to enlarge
10. Deposit to Open BU
Boston University has an opt-out open access policy for all scholarly articles authored or co-authored by faculty members since February 11, 2015. See a quick overview of the policy, the full policy text and open access FAQ for more information.
All faculty scholarly articles will be deposited in Boston University’s institutional repository, OpenBU, and, in most cases, made publicly available.
My CV helps you comply with the Boston University open access policy by tracking which scholarly and creative
works fall under the policy and allowing you to upload PDFs of your scholarly and creative works directly to OpenBU.
10.1 Why Upload your Work to OpenBU
By uploading your work to OpenBU, you will be complying with BU’s open access policy. The policy will increase the exposure of new knowledge we produce, and therefore heighten its impact. There is evidence of significant citation advantage to openly accessible materials. In addition, placing the responsibility for access increasingly with academic libraries rather than with publishers increases the chances of longer-term consistent access, and decouples long-term access from initial production and marketing costs.
Even if you choose to embargo an article temporarily or for the entire length of its copyright term, depositing it into OpenBU will assist the university in its effort to preserve its intellectual output for the long term.
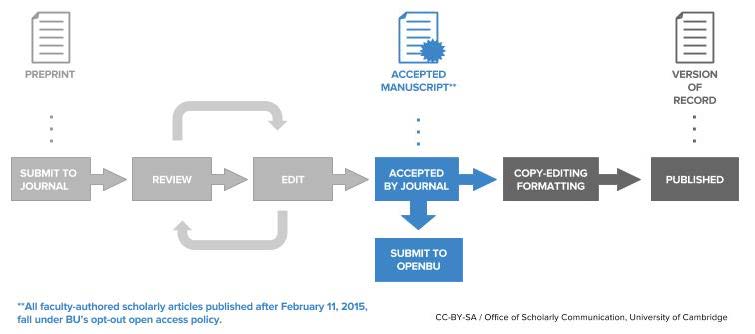
10.2 What to Upload to OpenBU
The open access policy applies to scholarly articles authored or co-authored by BU faculty members and completed after the policy was adopted on February 11, 2015. My CV will flag all scholarly and creative works that fall under the policy and prompt you to deposit them in OpenBU.
The version of the publication that you should upload to OpenBU is the accepted manuscript, after peer review but before the publisher does copy editing and layout. The diagram below shows the versions of an article produced during the publication process.
10.3 The OpenBU Deposit page
If you have scholarly and creative works with a status of Claimed that fall under BU’s Open Access policy, you will see the following prompt on the My Actions panel of your home page:

By clicking either the Deposit Scholarly and Creative Works button (from the home page) you will be taken to the OpenBU deposit page.
The Deposit Page contains important advice and guidance for complying with Boston University’s Open Access Policy. This text can be found in the greenish-blue box and under the heading of Deposit advice – Institutional advice.
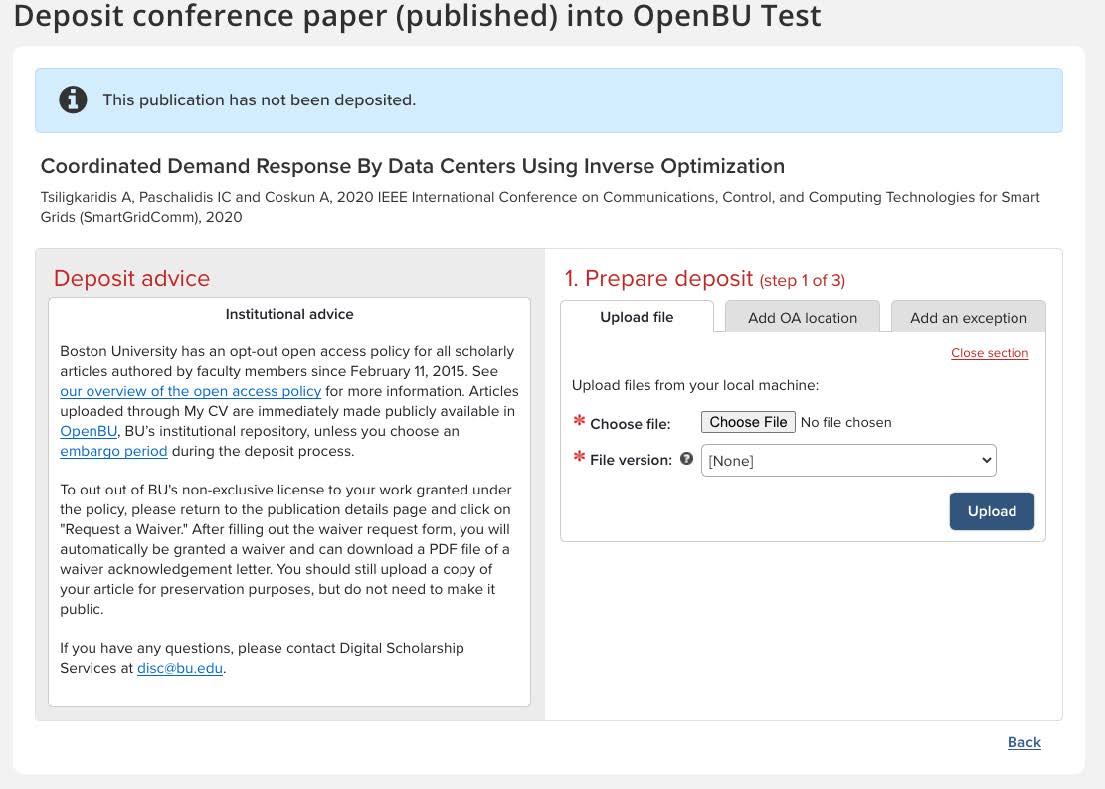
10.4 Deposit a File to OpenBU
From the Deposit Page, you can upload a file for deposit into OpenBU.
a) Click browse to locate the file
i. The version of the publication that you should upload to OpenBU is the accepted manuscript, the draft after revisions but before the publisher does copy editing and formatting. Only upload the published version of your article if the publisher specifically allows it.
b) Select the respective file version
c) Click Upload
You then have the ability, before depositing the publication, to:
-
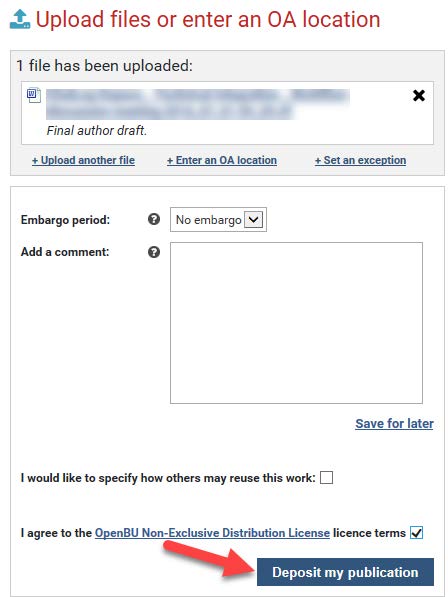
Click image to enlarge Specify when, if at all, you would like to make this article openly accessible in OpenBU by selecting an option in the Embargo period dropdown menu.
- To make this article openly accessible immediately, select No embargo.
- To make this article openly accessible after a designated period of time, select one of the time periods from the dropdown.
- To never make this article openly accessible while it remains in copyright, and deposit only for archiving purposes, select Indefinite.
- Add a comment that can be viewed by the BU Libraries’ OpenBU administrator.
- Specify how others may reuse your work, which applies a Creative Commons license.
- If applicable, set an exception.
- If your publication has been mistakenly flagged as falling under the open access policy, select Other. Provide a brief explanation of why your publication does not fall under the policy. You do not have to deposit your article.
After you accept the OpenBU Non-Exclusive Materials Management license and click Deposit My Publication, you will receive confirmation that the publication was successfully submitted to OpenBU. After you submit your article, it will be reviewed by the OpenBU administrator, and you will be notified when it is live in OpenBU. If you need to make any changes to your submission while it is under review, such as adding or deleting files, contact openhelp@bu.edu. Once your article is live in OpenBU, you may upload additional files, but you may not delete any files.
To make a deletion request, contact open-help@bu.edu.
10.5 Deposit to OpenBU Using an Open Access Location

If your publication file is already available in an Open Access (OA) location, such as an preprint or subject repository (i.e., arXiv, PubMed), you can simply add the URL to that location rather than uploading the file.
a) Click the Enter an OA location tab
b) Select the respective file version
c) Click Save Location
You will then have all the same options as outlined above in Section 10.4: Deposit a file to OpenBU.
11. Request a Waiver
Through BU’s opt-out open access policy, faculty authors grant BU certain non-exclusive rights to their scholarly articles, which allows BU to make articles publicly available in OpenBU. Authors can opt out of this rights transfer by requesting a waiver, on an article-by-article basis. All waivers are automatically granted, and authors can download a PDF file of a waiver acknowledgement letter for their records. For further information about obtaining a waiver, see the Open Access Policy FAQ.
Important note: Even after receiving a waiver of the rights transfer, authors are still requested to deposit their articles in OpenBU for long-term preservation, but can choose not to make their work publicly available.
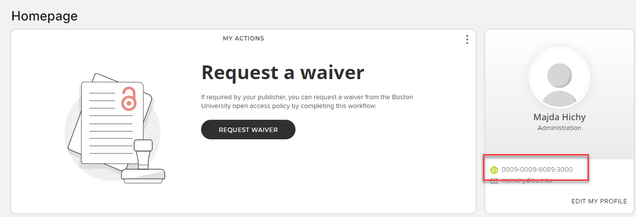
 You can request a waiver for a claimed publication or a new publication by navigating to the Homepage > Request a waiver and selecting the Request Waiver button.
Once you get to the waiver request form:
a) Enter your name, address, and the reason for requesting a waiver
b) Click Request waiver
A waiver acknowledgement letter on Boston University letterhead will be automatically generated, and you can download a PDF file of the letter from the publication details page.
12. Export Your Scholarly and Creative Work Records
You can quickly export a list of your scholarly and creative work data. Navigate to your scholarly and creative works page by clicking Menu > My Profile > My Work > Scholarly & Creative Works.
a) Depending on what you want to export, click the Claimed, Pending or Rejected tab
b) Click Export
c) Select the file type you want your export to appear in

13. Additional Resources
More information about My CV, including contact information for your My CV Liaisons, additional User Guides and Frequently Asked Questions, can be found on the My CV Project Website.