Many students find working in the visual mode a productive change. Thes two related exercises help students better understand challenging texts and prepare to write a paper on them. You may find that one or another works better in your class, or you may choose to use both, at different points in the semester. This activity also works well with online tools such as Jamboard and may be of special interest when teaching remotely; see a Jamboard variation handout here.
Key Terms
multimodality; metacognition; reading strategies; audience; visual mode; creativity; group activity; collaboration; mind map; concept map; research question
Exercise 1: Creating Visual Schema for Texts
Students create a list of best practices for understanding a text and then apply these strategies to a challenging text to represent it visually for an audience that is interested in but unfamiliar with it. This exercise helps students to better understand a challenging text by simplifying its abstract concepts into images. It also makes explicit reading strategies that students can transfer to other contexts.
Objective
To apply effective systems of thinking from a previous text as a way to formalize analytical habits
- Individual Reflections
- What in-class activities (discussions, small group activities, writing prompts) helped you to organize your understanding of our previous texts? Why?
- How can you generalize these activities so that you can apply them to any text?
- Group Discussion: Share your answers with your small group and create a list of “best practices” for understanding a challenging text. Consider the following questions to begin organizing your ideas:
- What general key terms/concepts need defining? (Your reader is unfamiliar but interested.)
- What background information needs to be summarized to provide context?
- What structural information (how the book is organized, sections, etc.) is necessary?
- What kinds of evidence does the text draw on?
- Creative Activity
- Create a visual schema for our text to help an unfamiliar reader understand it.
- As you create your visual schema, try to balance general and particular information.
- Be creative with your schema; you have complete freedom.
- After your group has finalized your schema, you will present it on the chalkboard, poster board, or via a free idea mapping tool like MindMup or LucidChart or another program and share it with the class.
Student Samples
Maggie Nelson’s Jane:

The image above shows a chalk-drawn flower on a classroom blackboard, with words written on the parts of the flower representing different elements of the text.
The Beautiful Struggle by Ta-Nehisi Coates:

The image above shows a pencil and marker sketch on a large sheet of paper, with symbols and quotes from the text.
Here’s a downloadable version of this activity to distribute to students.
Exercise 1.5: Creating Visual Schema for Texts (Jamboard edition)
Consider using online tools such as Jamboard, especially when teaching remotely; see a Jamboard variation handout here, with pictorial directions for students (particular to one instructor’s texts) and a sample Jamboard schema here:
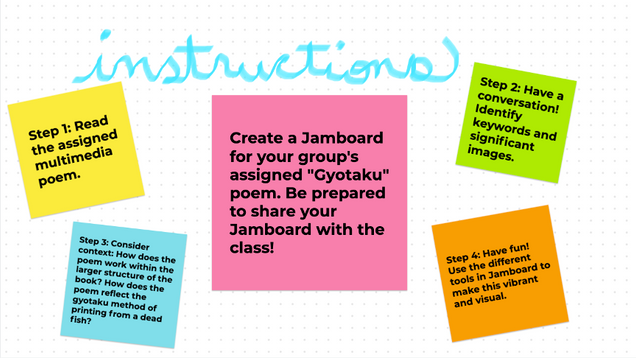
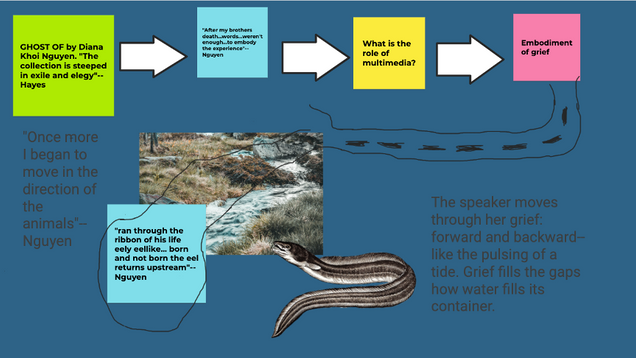
The images above show an image of a “sticky note” Jamboard with directions (directions text also available here) and a sample of a Jamboard schema with sticky notes, images, and words to represent a text
.
Exercise 2: New Perspectives on Interpreting and Connecting Texts
This brainstorming activity asks students to visually represent class readings in order to generate a research question and potential ways to answer it. It ends by asking students to write an elevator story about their essay’s possible direction.
Objective
To spark new ways of thinking about how to generate a research question; to visualize connections between various texts; to strengthen concepts of narrative in argumentative writing
- Visualize: In any pictorial form you’d like, without using words other than the title of each text, express the main issues/themes for 1-2 of our texts. Ideas: comic strips, symbols and numbers, maps, stick figures, etc.
- Make Connections: Look at the story-images you created for the text(s):
- What larger themes/problems surfaced?
- Which images resonate most strongly for the text(s)?
- Are there patterns and repetitions in your images?
- Consider one issue that appears in your visualization: What is the text saying about this issue?
- Create a Research Question and Answer
- What question do you want to ask about one problem/issue found in the text(s)?
- What is the text’s response? (As in, what is/are the text(s) saying about this problem?)
- Write an Elevator Story: Finally, imagine telling a 15-second story of the ideas you’ve generated in this activity. This is all hypothetical for now, but that’s fine; it will help you begin to imagine your paper.