Once you have at least one Section Editor, you can start creating your Section Groups:
- Open the Section Groups menu.

Section Groups top level menu item
- Click on the Add New option.
The edit group screen is broken in to three primary sections that can be accessed by clicking the respective tab:

Edit group navigation tabs
Properties
Give your group a unique name and description on the properties tab. These values are only viewable by Site Administrators, and can be used to help identify each group by function.
The name should be unique and easily identifiable. You can use the description field to provide additional insight in to the purpose of this group.

The Group Properties tab, filled out for the Training Site
Members
The members tab allows you to assign and remove members for this group. The members tab has two panels: Add User to this Group and Group Member List.
- Use Add User to this Group to find the Section Editors that you would like to add. The text input inside the Add User to this Group panel features an autocomplete behavior to help you find users that belong to your site. The autocomplete tool tracks your keystrokes as you type, using your in-progress text value to query the site users and render a list of Section Editors that you may be looking for. The tool checks your input against usernames, display names, and email addresses in your site’s user pool. You can only add users that have the Section Editor role.

- Once you have found the users you want to grant group membership for, click on the Add button and watch them appear in the Group Member List below.
You can repeat this process to add as many members as necessary. If you accidentally add a member that you did not intend to, or a member is no longer needed for the group, you can click the Remove link next to their name to remove them from the group. Note that switching a users role to something other than Section Editor will also remove them from any section editing groups they belonged to.

Our group now has one member — wpcms02 (Beta WordPress).
Permissions
The permissions tab allows you to grant permissions for this group to specific content.

The permissions tab is broken in to separate sections for each post type available for your site. You can switch between permissions editors by clicking on the tab for the post type you want to set permissions for. The default tab is Pages.

All post type editors will show each post in one of two states — allowed or denied. The default state for all content is denied. This means that a Section Editor will not be allowed to edit any content until you explicitly permit it through a section group.
![]()
![]()
For hierarchical post types, it is possible to have a parent that is editable, but children that are not, and vice versa. These contradictory states are represented as well.
![]()
![]()
Clicking on a post will reveal a button that allows you to toggle permissions. If a post is denied, a green button will appear labeled Allow. If a post is already allowed, a red Deny button will appear. Clicking on these buttons will toggle permissions.


Set Page Permissions
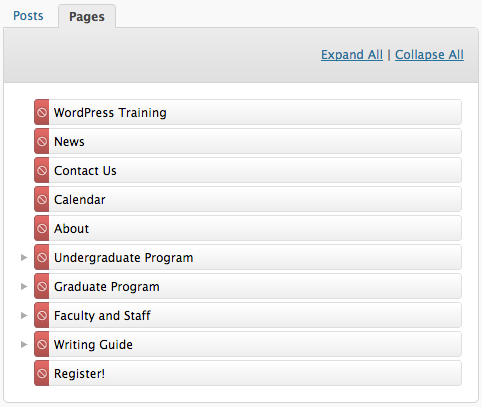
Hierarchical Permissions Editor
The permissions editor for hierarchical post types, such as Pages, presents you with a tree-like view of your content. Any page that has a right facing arrow next to it is a section — meaning it has at least one child page beneath it. Clicking on this arrow will expand the section to reveal its children. You can click on the Expand All link to reveal all child pages, and the Collapse All link to return to the default collapsed state for all pages.
Remember that all content is denied by default. In order to allow a page for editing, you click on it once to reveal the Allow permissions toggle. Clicking on Allow will change the permissions indicator from a red denied symbol to a green checkmark — the page is now editable for any members in your group.
If you toggle permissions for a section, the new permission will be propogated to all descendents of the selected page:

Step 1 – Select a section

Step 2 – Allow editing for the section
The Undergraduate Program section is now editable for members of this group. Child pages don’t have to share the same permissions as their parents. For instance, if this group should be able to edit everything in “Undergraduate Programs except for Special Programs and Courses , that is supported by the plugin:
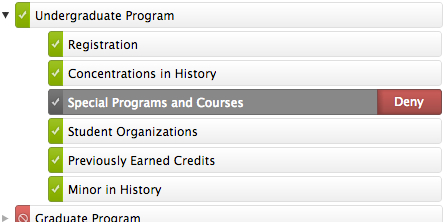
Step 1 – Denying a child page
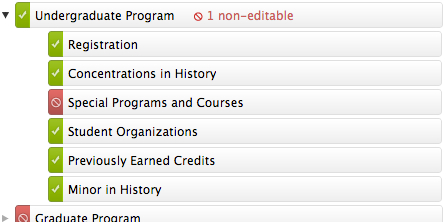
Step 2 – Child page is now denied
Let’s continue in the next section by setting Post permissions for this group.
Set Post Permissions
The permissions editor for flat post types (like Posts) differs in a few ways from those for hierarchical post types.
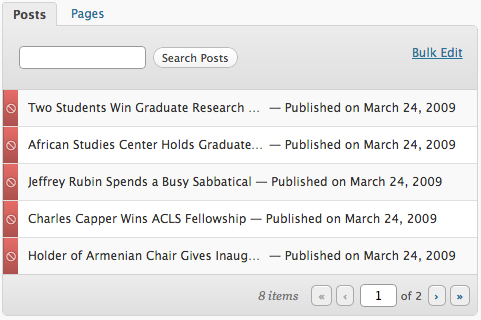
Flat permissions editor
For one, flat post types do not allow children, so the collapsible tree view is replaced with a simple list. The tree view used by the hierarchical permissions editor makes it relatively straightforward to find content and set permissions for multiple posts. Since flat post types can not be organized in sections, the toolbar areas above and below the post list have some extra features to help you find content you seek to edit permissions for:
- Search — Filter the post list by a search term to find the specific post you are looking for.
- Pagination — While the tree view used for hierarchical post types can hide hundreds of pages in collapsed sections, that is not the case with flat post types. Pagination is provided to keep the list size manageable.
- Bulk Edit — While the hierarchical permission editor can grant permissions to entire sections with two clicks, the flat permission editor requires a different approach to bulk editing. Clicking on “Bulk Edit†will place the editor in bulk edit mode.
Aside from these differences, settings permissions works the same way as it does for hierarchical permission editors.
If Alpha WordPress, our training Site Administrator, wants to allow Beta WordPress to edit Undergraduate Program-related posts, she might do it as follows:

Step 1 – Find post

Step 2 – Select post

Step 3 – Allow post
Pagination
Pagination works the same way that it does in other areas of the WordPress admin:

Flat post editor pagination usage
Note that you can configure the number of posts that appear per page by using the screen options:

Flat post editor – posts per page screen option
This setting will affect all flat permissions editors. The pagination toolbar will not appear if you do not have more posts than this setting is looking for.
Bulk Edit Mode
Clicking on the Bulk Edit link change the permissions editor to bulk edit mode. As soon as you click the button, the post list changes:
- An extra toolbar pops up at the top with a checkbox, a Bulk Actions drop-down menu, and an Apply button.
- A checkbox appears to the left of each post.
The function is similar to how you bulk edit your Posts or Pages. Toggle the boxes for posts you want to affect, choose an action, and click Apply to take action on the checked posts:

Step 1 – Enable bulk edit mode

Step 2 – Toggle checkboxes next to posts you want to change permissions for

Step 3 – Select action from the Bulk Actions dropdown, click Apply
Save Your Group
Once you have named your group, added members, and set permissions, your group is ready to go. You may have noticed an alert if you tried to leave the edit group page at any point during this tutorial.

Confirm navigation alert with pending edits
In the same way that changes to a Post or Page are not saved until you hit the Publish or Update button, changes to your section group are considered pending and will not be applied until you hit the Add Group or Update Group button. This button is located at the bottom, right-hand side of the Modify Group panel. The label will change depending on whether or not you are adding a new group or modifying an existing one.

Notification after successful section group save
The other action available in the Modify Group panel is Delete. If at any point the group is no longer needed, you can click Delete to permanently remove it from your workflow.
Group Statistics View
@todo add screenshot
You may have noticed while modifying your group that the right-hand panel (labeled Modify Group) has been updating to reflect your changes. This panel cues you in on what has changed since you last saved the group.
- The Name row will update to reflect the current value in the group name field of the properties panel.
- The Members row count will increase or decrease as you add and remove members for this group on the members panel.
- The Permissions to Edit row will show green and red counts to represent the amount of posts that have gained or lost permissions for each post type.
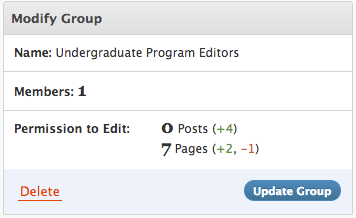
The Modify Group panel showing permission changes.
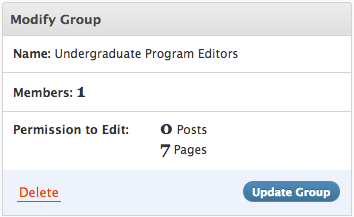
The Modify Group panel without statistics.

