loading slideshow...
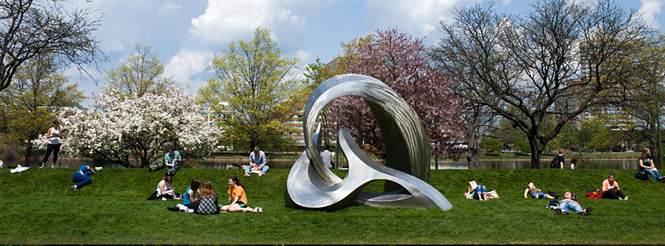
Artistic Inspiration
This sculpture on the lawn at the "BU Beach" is one of many eye-catching pieces of art you'll see around campus.

Marsh Chapel
Marsh Chapel is physically located near the center of the Charles River Campus, and also serves as the University's spiritual center as well.

Classrooms
BU classrooms bring together a diverse group of students from all over the world who are getting a world-class education.

Flag
The BU flag - denoting the motto of Learning, Virtue, Piety - flies over Marsh Plaza.

Commencement
A packed house at Nickerson Field celebrates the commencement of another class of BU graduates.

The Charles River
The Law School tower features prominently in this beautiful photo of the Charles River near dusk.

Climbing the Wall
BU's Fitness and Recreation Center features an indoor climbing wall, for both teaching and recreation.
Overview
BU Slideshow is a plugin for creating and managing slideshows. It is designed to be simple enough for any site admin to use, and powerful enough to meet the needs of designers. The plugin has many optional functions that make it flexible enough for a variety of uses: slideshows, photo rotations, feature card decks in the sidebar, etc.
The plugin is available for all BU websites that use a theme based on the Responsive Framework theme. Please submit a ticket to IS&T to request the BU Slideshow plugin to be enabled on your site. The BU Slideshow plugin is not available on blogs.bu.edu.
Getting Started with BU Slideshow
The plugin adds new items in the WordPress dashboard sidebar menu: Slideshows and Add Slideshows.
To create a new slideshow:
- Click Add Slideshow in the WordPress dashboard sidebar.
- Enter a name for your slideshow.
- You start with an Untitled Slide — Select Image and enter a Title for each slide.
- Click the Add New Slide button to add more slides.
- When working with multiple slides, click the triangle icon to toggle the settings panel open/closed for each slide.
- When you are finished, click Create Slideshow.
- You can always go back in to edit/add slides and change options — you don’t need to finish it all at once!

Editing Slideshow
You can edit a slideshow at any time by going to the Slideshows admin page and then clicking the Edit button next to the specified slideshow name.

Managing Slides
- Whether creating a new slideshow or editing an existing one, you can always add a new slide by clicking the Add New Slide button.
- When working with multiple slides, you can expand/collapse the editing panel for individual slides by clicking on the arrowhead in the top right corner of the panel.

Deleting Slides
- When editing your slideshow, expand the panel for the slide you want to delete.
- Click the red delete slide link in the bottom right corner in slide settings panel.
- A dialogue box will pop up asking you to confirm deletion — click OK.
- Remember: your changes are not immediate — they will not take effect until you click the Save Changes button as well.

Reordering Slides in a Slideshow
- After selecting a slideshow to edit, simply click and drag the titlebar for any slide panel to reorder it in the slideshow.
- Remember: your changes are not immediate — they will not take effect until you click the Save Changes button for your overall slideshow.

Adding Images to a Slide
IMPORTANT NOTE: For best results, use consistent image sizes. Sizing/cropping all images to the same dimension works best. The Responsive Framework theme works well with large images, but it is generally unnecessary to upload images wider than 2000 pixels. Larger images will make page loads slower — especially on mobile devices.
You can add an image that is already in your Media Library, or you can upload a new image.
Adding an Image Already in your Media Library
- When adding/editing a slide, click the Select Image button.
- From the Select Image box, click the Media Library tab at the top of the screen.
- Click the thumbnail for the image you wish to add. The selected image will display a checkmark in the top right corner.
- Specify the image size you want from the Attachment Display Settings at the bottom of the right sidebar menu.
- Click the Select Image button after you’ve selected your image and it’s corresponding settings.
Adding an Image via Upload
- When adding/editing a slide, click the Select Image button.
- From the Select Image box, click the Upload Files tab at the top of the screen.
- A: Click the Select Files button to locate an image on your computer to upload;
B: Or drag-and-drop from a folder on your computer’s filesystem (Explorer/Finder) onto the Upload Files panel in your browser. - Once the image file is uploaded, specify the image size you want from the Attachment Display Settings at the bottom of the right sidebar menu (same as step 4 above).
- Click the Select Image button (same as step 5 above).

Removing Images from a Slide
- Click the indicator arrow in the top right corner of a slide to expand and view all options/settings.
- Click the Remove Image button.
- Click the Save Changes button.
NOTE: Removing an image from a slide does not delete the slide itself.

Editing Images in a Slide
- Open any individual slide panel to reveal settings.
- On the left side of the slide panel, under the image thumbnail, you will see the image filename and an Edit link. Click this link to open the image in the WordPress image editor. Here, you can perform image editing functions such as crop and resize.
- Also below the image thumbnail, you will see the Image Size Options in a drop-down menu. Select the appropriate image size for the slideshow you are editing.
- Click the Save Changes button to save the slideshow with your changes. (NOTE that the image size selector only appears after you have clicked the Save Changes button.)

Change the Title of a Slide
- Click the indicator arrow in the top right corner of a slide to expand and view all options/settings.
- If it’s a new slide, delete the default text — “Untitled Slide” — and type the desired slide title into the Title field.
- If you do not want a title on the slide, leave the Title field blank.
- Click the Save Changes button.

Placing and Styling Captions
Editors can easily set the location of the caption on a per-slide basis, with advanced options for custom styling.
- When placing a caption, you can choose from 7 caption position options simply by selecting from the menu. The options include any combination of top/bottom for vertical placement, left/center/right for horizontal placement, and middle/center.
- For advanced styling options, you can now add your own CSS class name(s) on a per-caption basis. Along with the Custom CSS plugin, you can then write CSS style definitions to control fonts, font colors, font sizes, background color, etc.

Link a Slide to Another Page
Links, when specified, are applied to the caption and the image.
- Click the indicator arrow in the top right corner of a slide to expand and view all options/settings.
- Copy/paste the destination URL into the Link field.
- Click the Save Changes button.

Editing a Slide's Caption
- Click the indicator arrow in the top right corner of a slide to expand and view all options/settings.
- Type the desired text into the Caption field.
- Click the Save Changes button.

Adding a Slideshow to a Page
- Navigate to, and enter the WordPress editor for, the page where you’d like to add a slideshow.
- Click the Add Slideshow button directly above the content editing window.

- A popup window will allow you to define several options for embedding the slideshow on a web page:
- STANDARD OPTIONS

- Select Slideshow: Select the title of the slideshow you wish to display on this page.
- Select transition type: Slide is the default type (images slide out of frame as the next image slides into the frame). You also have the option of fade transition.
- Display Navigation: Check this box to display slide navigation; turn the check box off to embed a slideshow without slide-by-slide navigation.
- Navigation style: On-slide navigation can be set to appear as icons or as sequential numbers.
- Automatically play slideshow: Turn on the check box for the slideshow to begin playing automatically when a visitor loads the page. Un-check the box to require the user to navigate between slides.
- Shuffle slides: Turn this on to have the slides display in a random order.
- ADVANCED OPTIONS

- Fixed width: Specifies a fixed width, in pixels, for the slideshow.
- Alignment: If your slideshow is not the full width of the available content area on the page where it is embedded, you can set the horizontal alignment of the overall slideshow here.
- Custom Transition: Overrides transition selected under “Select Transition Type.” You must provide custom CSS transition code if you enter a value here.
- Slide transition delay: Slow down or speed up your slideshow by setting the number of seconds between slide transitions.
- STANDARD OPTIONS
- Once you’ve specified your desired options, click Insert Slideshow.
- The single line of code that appears holds information for your specified options. When you next update and view your page, the slideshow will appear.
Adding a Slideshow in a Widget
NOTE: This capability only works in the BU Text widget.
- Perform the steps above to add a slideshow to a page.
- After you insert the slideshow into the page, highlight and CUT the shortcode from the visual editor.
- Click your cursor into a BU Text Widget, and PASTE the code into the widget.
- Click Save Draft, Publish, or Update (depending on the status of the page) to save the page and widget.

Advanced Options
The information below is for users who have some experience with manipulating code (particularly HTML and CSS) and want even more customizable options.
Slideshow Shortcode and Support Attributes
Slideshows are displayed with the shortcode bu_slideshow. The attributes supported are:
- show_id: The numeric ID of the slideshow to be displayed.
- show_nav: Whether to display slideshow navigation. Defaults to “true.”
- nav_style: Style of the slideshow navigation. Defaults to “icon.” Currently “icon” and “number” are supported.
- transition: Name of transition type to use. Currently the plugin offers “slide” and “fade,” with “slide” being the default. Any value can be entered here, and it will be output as a class in the slideshow with a prefix of “transition-,” e.g. “transition-mytransition.” This allows for the support of custom transition as defined via CSS.
- autoplay: Whether the show would automatically animate on a timed interval. Defaults to “true.”
- show_arrows: Whether arrows should be displayed on either side of the slideshow, allowing user to move backward and forward in show. Defaults to “false.” This is the only attribute that cannot be edited in the UI.
- width: Either a numerical value (in pixels) or “auto,” which allows the slideshow to fill its container horizontally. Defaults to “auto.” Slides are set to the height of the tallest slide. Images have “max-width: 100%” applied and will scale down to the slideshow width as necessary (which may affect slideshow height). The slideshow resizes with the page, so it plays nice with device orientation changes.
If “autoplay” is set to false, the plugin will set “show_arrows” to true, unless “show_arrows” has been explicitly set to false in the shortcode. This is to help ensure that visitors always have a clear way of moving through the show.
Advanced Height Option
Depending upon how and where you embed a slideshow on a page, you may wish for the page to hold a space for the height of the slideshow while the slides are loading. This prevents the content from “jumping” on the page after the slides load and slideshow begins.
You can set this option individually on each slideshow. Just edit your slideshow, scroll to the bottom of the editing window, and set the Default Height option in pixels.

Slideshow Custom CSS
Slideshows are given a CSS class created from the name you give the slideshow. You can target your slideshow – and individual slides – by using this CSS class and your own CSS classes. Browse the page that contains your slideshow, and view page source in your browser to determine your slideshow’s CSS class name.
In order to use custom CSS, you must first enable the Custom CSS plugin.
Example 1) If you want to put a solid, BLACK border of 2 pixels around your slideshow, add the code below to your Custom CSS window, replacing “mySlideshow” with the CSS class name of your slideshow:
.mySlideshow {
border: 2px solid black;
}
Each caption is given a class name of “.bu-slide-caption.” You can add other custom class names via the settings box for each individual slide.
Example 2) If you want to put a solid, RED border of 2 pixels around just one of the slides in the same slideshow, add the code below to your Custom CSS window, replacing “mySlideshow” with the CSS class name of your slideshow and “myCustomSlideClass” with the name of your custom-created CSS class name:
. mySlideshow .bu-slide-caption .myCustomSlideClass {
border: 2px solid red;
}
Custom Slideshow Transitions
Sequence.js uses CSS 3 transitions that must be defined by the developer (if CSS 3 transitions are not supported in the browser, it falls back to a js-based slide animation). BU Slideshow defines transition states for slide and fade animations. When the slideshow markup is output, the transition type is added a class (e.g., “transition-slide”) and the relevant CSS is declared as descendants of this class.
Custom transitions can be defined using the Custom CSS plugin or within a theme’s CSS. The relevant styles should descend from a “transition-mytransition” class, where “mytransition” is the name you want to give it. Users can then enter “mytransition” as a custom transition in the modal form (or directly as the “transition” option in the shortcode) and your custom transition CSS will be used.
For more on how to write animations for sequence.js, see the Sequence documentation and BU Slideshow’s CSS files. The use of CSS allows for great flexibility in animations.
Using BU Slideshow in the Content Banner
BU Slideshow does not work in the “Content Banner” section for sites using Responsive Framework version 2.
Older sites (Responsive Framework v.1) can still use BU Slideshow as a content banner, but some themes may require a bit of Custom CSS to prevent the dropdowns of your primary navigation menu from displaying behind the slideshow. To use the BU Slideshow as a content banner:
- Embed the BU Slideshow shortcode onto your page.
- Change your content banner settings to use the “hand-crafted HTML” option.
- Cut/paste the BU Slideshow shortcode from your page into the content banner code section.
- If your dropdown menus from the primary navigation display behind the slideshow, add this code in your Custom CSS:
.banner-container > div { z-index: 1; }

