Content Restriction consists of two parts: a) Restricting Pages, and b) Restricting Media Content.
Restricting access to a page does NOT restrict access to any linked documents in your Media Library. You must also restrict access to uploaded media content separately.
You cannot restrict access to Posts in WordPress.
Restricting Pages
When creating a new page, or editing an existing page, you’ll notice below the content box is a box titled Restrict Access to this Page, which looks like this:

Restrict Access to this Page
If you want to restrict the page you’re currently working on, select the checkbox, and select the group that you want to allow access to from the drop-down menu. Once selected, be sure to Update the page. If the page is not updated, the changes will not take effect.
When you restrict access to a page that is a parent (i.e., the page has children), that restriction is applied to all child pages as well.
If you need to remove restriction to a page simply uncheck the Restrict access to this group checkbox, and re-update your page.
Restricting Media Content
If you want to restrict media content (images, PDFs, docs, AVI files, etc.), use the Media Content Restriction.
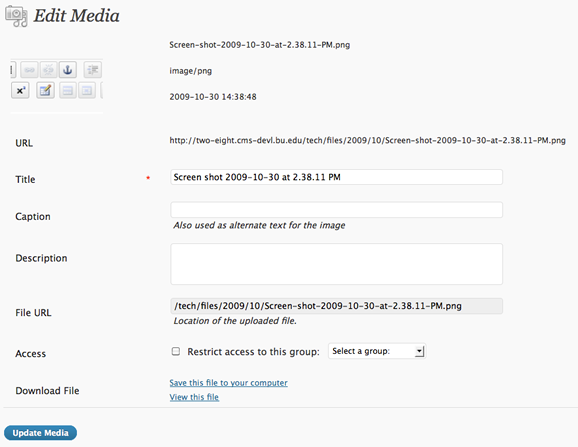
To restrict a specific piece of media that you’ve uploaded, you’ll need to log in to your WordPress Dashboard, select Media, and then select Library.
Select the media content you want to restrict by clicking on the file name under the File column.
On the Edit Media page, check the checkbox next to Restrict access to this group and select the group you want to allow access to from the drop-down.
Restrict Media Content
When done, click Update Media.
If a file is protected, you’ll see the Lock on the Media Library list of media items.

Access Restricted
If an image is protected, the page where it is displayed will show a broken image in its place for users who are not logged in.