Blackboard Learn may not run properly if you are using an incompatible version of Java or if you have multiple versions of Java installed. Use these instructions to locate and adjust your Java configuration as necessary.
Windows Vista / 7
 Check Your Version of Java
- Click the start button in the lower left-hand corner of your screen.

- Click the Control Panel icon.

- This will open up your Windows Control Panel window. You will see the Java icon under either Programs or Additional Options.

- Click the Java icon. It looks like a coffee mug. If a Windows User Account Control security window appears asking for permission to run the program, click Allow.

- On the General tab, click on the About… button
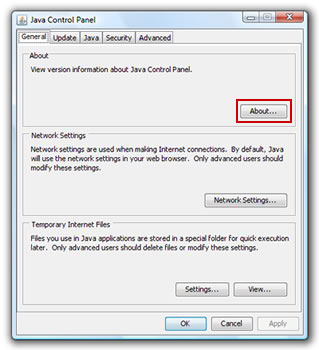
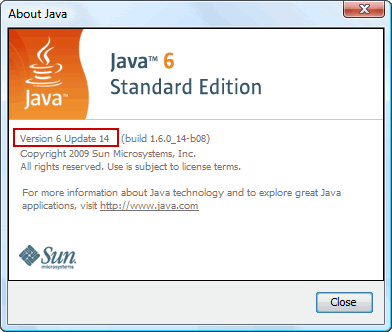
- Locate your Java version. Your computer should be running the latest version of Java. If your version isn’t the latest version, you can follow the instructions below for Get the correct version of Java.
 Get the correct version of Java
Windows computers accessing Blackboard Learn should be running the latest version of Java. To replace older, incompatible, or multiple versions of Java with the correct version, follow the steps below.
- Download the latest Java version to your computer’s desktop.
- Click the start button in the lower left-hand corner of your screen.

- Click the Control Panel icon.

- Click on Uninstall a Program.

- Click on the Java icon and then click Uninstall from the menu bar. If a Windows User Account Control security window appears asking for permission to run the program, click Allow. If you have more than one Sun Java, JRE, J2SE, or JVM program, make sure you remove all of them before installing the correct version of Java.

- Once you have removed all of the Java files, restart your computer and continue with step #7.
- After the computer restart, double-click the Java file downloaded in Step # 1 above to begin the installation process.
- Follow the on screen instructions. If you are prompted to install the Google Toolbar for Internet Explorer (or any other type of toolbar: MSN, YAHOO, etc), decline and proceed with the Java installation.
Windows 8
 Check Your Version of Java
- Press the Windows key on your keyboard to be brought to the Windows 8 Start screen.
- Type Control Panel and when you see the Control Panel icon, either click on it or press the Enter key on your keyboard to go into Desktop mode and launch the Control Panel.

- This will open up your Windows Control Panel window. Click the Programs link.
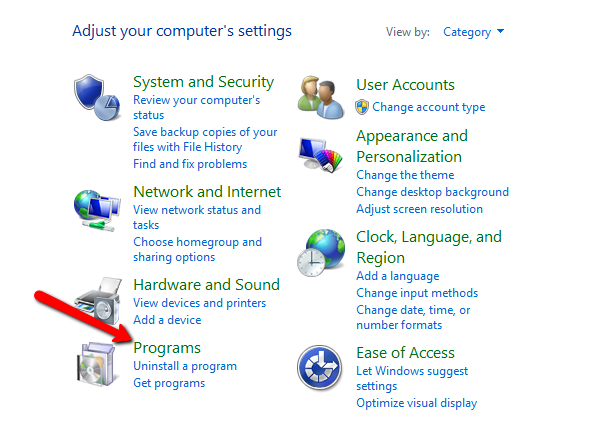
- Click the Java icon. It looks like a coffee mug. If a Windows User Account Control security window appears asking for permission to run the program, click Allow.

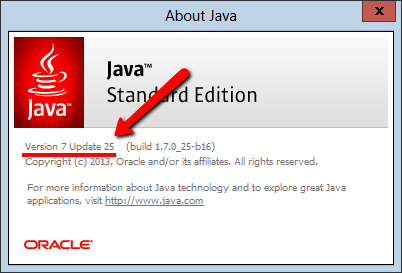
- On the General tab, click the About… button
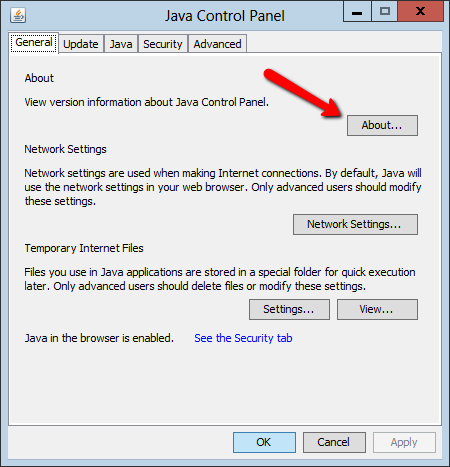
- Locate your Java version. Your computer should be running the latest version of Java. If you are not using the latest version you can follow the instructions below for Get the correct version of Java.
 Get the correct version of Java
Windows computers accessing Blackboard Learn should be running the latest version of Java. To replace older, incompatible, or multiple versions of Java with a the correct version, follow the steps below.
- Download the latest Java version to your computer’s desktop.
- Press the Windows key on your keyboard to be brought to the Windows 8 Start screen.
- Type Control Panel and when you see the Control Panel icon, either click on it or press the Enter key on your keyboard to go into Desktop mode and launch the Control Panel.

- Click on Uninstall a Program.

- Click on the Java icon and then click Uninstall from the menu bar. If a Windows User Account Control security window appears asking for permission to run the program, click Allow. If you have more than one Sun Java, JRE, J2SE, or JVM program, make sure you remove all of them before installing the correct version of Java.

- Once you have removed all of the Java files, restart your computer and continue with step #7.
- After the computer restart, double-click the Java file downloaded in Step # 1 above to begin the installation process.
- Follow the on screen instructions. If you are prompted to install the Google Toolbar for Internet Explorer (or any other type of toolbar: MSN, YAHOO, etc), decline and proceed with the Java installation.
