For Ultra courses, grades are centered in the Gradebook, which can be accessed via the respective icon in the upper right of your course’s main page. You can then choose to view the gradebook by graded items, student grades, or a gridded view of both.

Flexible Grading (NEW)
Flexible grading is an optimized grading experience that provides instructors with the flexibility to grade in their preferred style. With flexible grading, you can:
- Easily review the status of your grading tasks and prioritize your time where it is needed most.
- Provide inline, multimedia feedback direct to students.
- Easily access grading rubrics, anti-plagiarism checkers, and more as you work through your grading tasks.
Where to Start Grading:
- Grades page: The Grades page provides immediate access to all your courses’ grading tasks. From the navigation bar, select Grades. On the Grades page, grading tasks are organized by course, so you can quickly scan your progress, set priorities across the board, and even begin grading. No need to navigate to each course to see what’s ready for grading.The page only displays information if you need to take action. You see assignments that are ready to grade or overdue for students.
- Activity stream: You’re alerted when student submissions are ready for grading. Select the link to go directly to the Submissions page for the assignment. The Submissions page is filtered is filtered to only show students who need grading.
- Submissions tab of an assignment: When you access an assignment, the Submissions tab displays all students enrolled in your course. You can search for a student by name or student ID or use the Grading Status filter to display only those submissions that need grading.
- Gradebook: From a course, select the Gradebook tab on the navigation bar. You can choose a gradebook view:
- From the grid view From the Gradebook tab, select the Grid view button. From the grid view, you can see your roster of students who submitted new work. When a student has a new item to grade, select New Submission, View to access the grading page for the submission.
- From the list viewFrom the Gradebook tab, select the List view button with three horizontal lines, and then select the Gradable Items tab. You can sort assignments in this view by Grading Status. Graded work is labelled All Graded or Complete. Select the name of the assignment or X to grade to access the Submissions page. The Submissions page will have the Needs Grading filter applied. Select a student name to start grading a submission.
Grade an Assignment Submission
Select an assignment to grade to access the Submissions page. Then select a student to open the grading page.

From this page, you have several options:
- Students panel
- Expand the Students panel to view the list of students who submitted an assignment. Collapse the panel to view more of the submission.
- Use the Grading Status filter to display all students or select the Needs Grading filter to focus on remaining grading work.
- If a student has accommodations, a purple pill appears next to their name.
- If a student has late submissions or the due date passed with no attempt submitted, a red circle appears around their profile picture.
- When ready, you can select Post Grades to post grades for all graded students.
Note: If you enabled anonymous grading, all student names are masked.
- Grade information
- If the assessment is configured to allow multiple submission attempts, you can select which attempt to grade.
- After grading, you can view grades for each attempt and the final grade for the submission.
- Use the menu next to the final grade to post the student’s final grade or delete their attempt.
- Submission information
- View the submission receipt number and time stamp.
- Use BB Annotate options on the menu bar for inline grading & commenting of the submission.
- Show or hide the assessment content displayed to a student when they attempt a submission.
- If the student submitted more than one file, they appear on separate tabs you can move between.
Note: When grading from a tablet, only one of the side panels will be open at any time. Accessing one panel will collapse the other.
- Feedback panel
- Expand or collapse the feedback and rubrics side panel to add feedback for the attempt or grade with a rubric (if one is available).
- When you post grades, students can view feedback you provided for each attempt, including ungraded attempts.
- You can embed an audio or video recording of your feedback in the editor as you grade attempts. The recording option appears in the feedback editor for most graded items in your course. Students watch or listen to your feedback alongside any text you include.
Note: This feature isn’t supported on all browsers. For the best experience, use Chrome or Firefox.
Grade an Assignment with Multiple Attempts
When you create an assignment, you can choose to let students submit more than one attempt. Multiple attempts change how the assignment’s final grade is automatically calculated. Choose how you want to calculate the final grade:
- Average of all attempts
- First attempt with a grade
- Attempt with highest grade
- Last attempt with a grade
- Attempt with lowest grade
If the student has made multiple submission attempts, you can select which attempt you want to grade. In the attempt dropdown menu, you can view the attempt number, the submission time stamp, and the grade for each submission made.
Note: You can’t allow multiple attempts on a group assignment or when you collect submissions offline.
The Grade attempts setting determines how the final grade is automatically calculated, but you have the option to override the final grade. Each attempt is subject to the due date you set for the assignment. If a student submits an attempt after the due date, the attempt is marked late. Attempts submitted before the deadline are shown as on time.
You can only override the final grade, not the grades for each attempt. If you assign an override grade without grading the student’s first attempt, the attempt displays a Needs Grading status. An override label appears next to the grade.
Note: When you post grades, students can view them and any feedback you provided. All feedback for all attempts, even ungraded attempts, shows to students. If you used a rubric or questions that are scored automatically, the grade may already exist for the attempt.
Final Grades
The final grade for a multiple attempt assignment is calculated based on the Grade Attempts setting you chose in the Assignment Settings. In the panel that lists a student’s attempts, the final grade appears when those attempts are graded. For example, if the final grade is calculated based on the highest graded attempt, the final grade appears immediately after at least one attempt is graded. However, the grade may change as you continue grading more attempts. After you finish grading the attempts, you can post the final grade for the student to see.
What do students see?
Assignments with multiple attempts list the number of attempts allowed, as well as how the final grade is calculated. Students view this information on the Details & Information page before they begin. When grades are posted, students can view grades for each of their attempts, as well as the final grade. If you decide to override the final grade, a message appears to let the student know.
Grade an Assignment with a Time Limit
When you allow students to work past the time limit for an assignment, you’re able to view which assignments exceeded the time limit. If you added questions, you can also view how many questions were answered after the time limit.
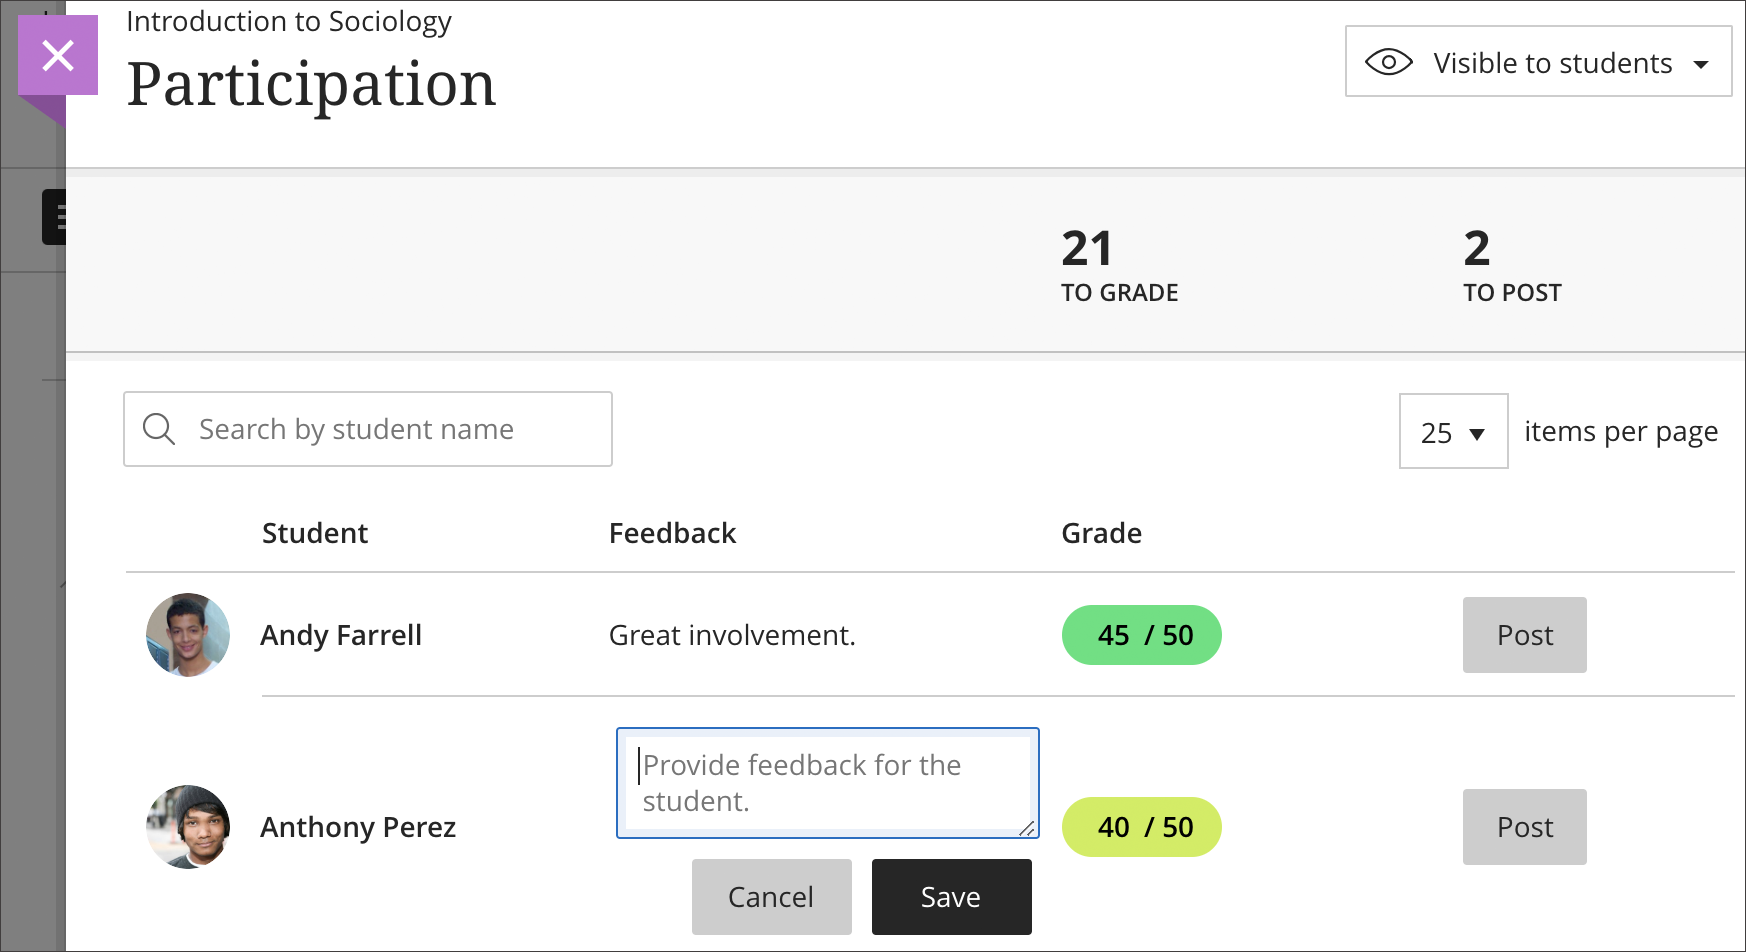
Post Grades
Post appears next to each grade you haven’t released yet. You can choose which grades to post and when. Posted grades appear with a Posted message in the column. You can also grade all submissions for an item in succession and then select Post all grades to release all grades in one action.
Note: When you post grades, students can view feedback you provided for each attempt, including ungraded attempts.
Gradable Items List & Students List
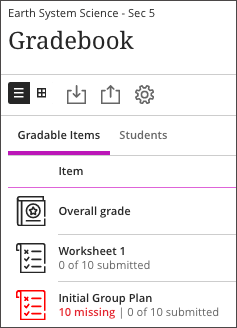
Gradable Items List
The Gradable Items list is the default view of the course Gradebook. You can view all the coursework you’ve assigned and the grading progress for the assignments, as well as change any settings.
You can switch to the Students tab (by clicking “Students” next to “Gradable Items”) to view an overall picture of each student’s engagement.
Automatically Created Grade Items
When you create a gradable item in your course, a gradebook item is created automatically. From the Gradable Items list, you can drag an item to a new location in the list.
If you open attendance from the Course Content page, you can add attendance to your gradebook. You can also add attendance on the main Gradebook page. Select the plus sign wherever you want the attendance row to appear in the list and select Add Attendance.
You can add grade items that don’t require submissions such as participation. These grade items are also called manual grades, manually created items, or offline items.
For manually added items, no submissions exist. You assign scores and feedback on the student list page.
Manually added items don’t appear on the Course Content page. The items do appear on students’ global and course grade pages. You can’t add files, rubrics, goals, or groups to manually added items.
In your course gradebook, you can add a new item in the Gradable Items list or student grid view.
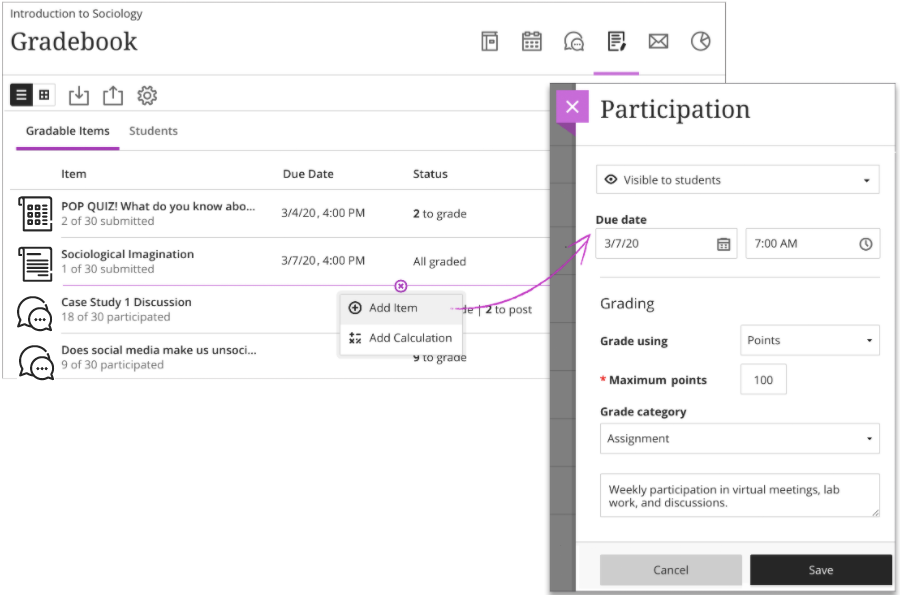
- Select the plus sign wherever you want to add an item and select Add Item.
- In the panel, type a title. The title has a limit of 255 characters. If you don’t add a title, “New Item” and the date appear in the list.
- Optionally, make the item visible to students.
- Provide the details, such as a description and a grade unit. You can choose points, percentage, or letter. If you choose points, specify the maximum number of points possible. A due date is optional.
- Optionally, add the new item to a category to use when you create calculations.
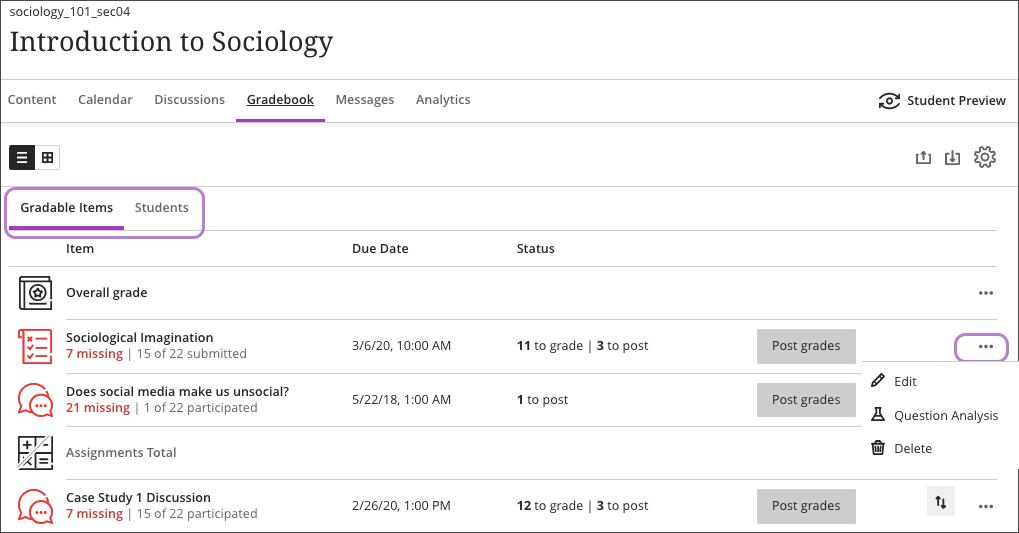
Managing Grades in the Gradable Items List
- Select an item’s title to see what students’ submissions need grading and which haven’t received their grades yet.
- Inside the submissions list for a gradable item, use the Filter menu to display only those submissions that need grading.
- At this time, you can filter by All statuses and Needs grading.
- In the submissions list, different statuses will appear for each student. Complete indicates you have no outstanding grading tasks for that item. All graded appears when all submitted attempts are graded and posted, but some students haven’t submitted work yet and don’t have grades.
- You can add items to the Gradable Items list by clicking the “+” symbol above or below an item.
- Add Item: Add a row for coursework, such as a participation grade. Your title is limited to 255 characters. Choose the grade unit, such as points or letter.
- Add Calculation: Add a row for a calculation, such as an average assignments grade.
- Add Attendance: Add a row for attendance. After you add attendance, the add option won’t appear in the menu again.
- In the Gradable Items list, rearrange items by pressing the two-paired-arrows icon in the row of the item you want to move. This icon won’t be visible unless you mouse over the desired item row at the far right end of it. Drag the item to the new location and release. The order you choose also appears in the Grid View and on students’ Grades pages.
Students List
View information about your students and their engagement in your course from the Students tab.

- View a list of your students along with columns for Username, Last Access, and Overall Grade. For the Overall Grade column, you need to set up the overall grade for grades to appear in the grade pills. You can sort the list in ascending, descending or default order by clicking the corresponding column header arrow icon.
- You can also sort the list by column selecting the arrow icon next to a column’s name. Every time you select an arrow icon it will change to show the student list in ascending, descending or default order.
- Use the Search function to find specific students by their name or username.
- Use the Items per page menu to select how many student rows to show on a page.
- Select the three dot menu at the end of each student row to view or create accommodations for a specific student, or to send direct messages.
- Select student names to view their submissions on their individual Student Grades page. In the Status column, you can see completed work, items that need grading, and grades you need to post. You can also view the grades and feedback you’ve provided, create accommodations and send direct messages.
Student Grades Grid

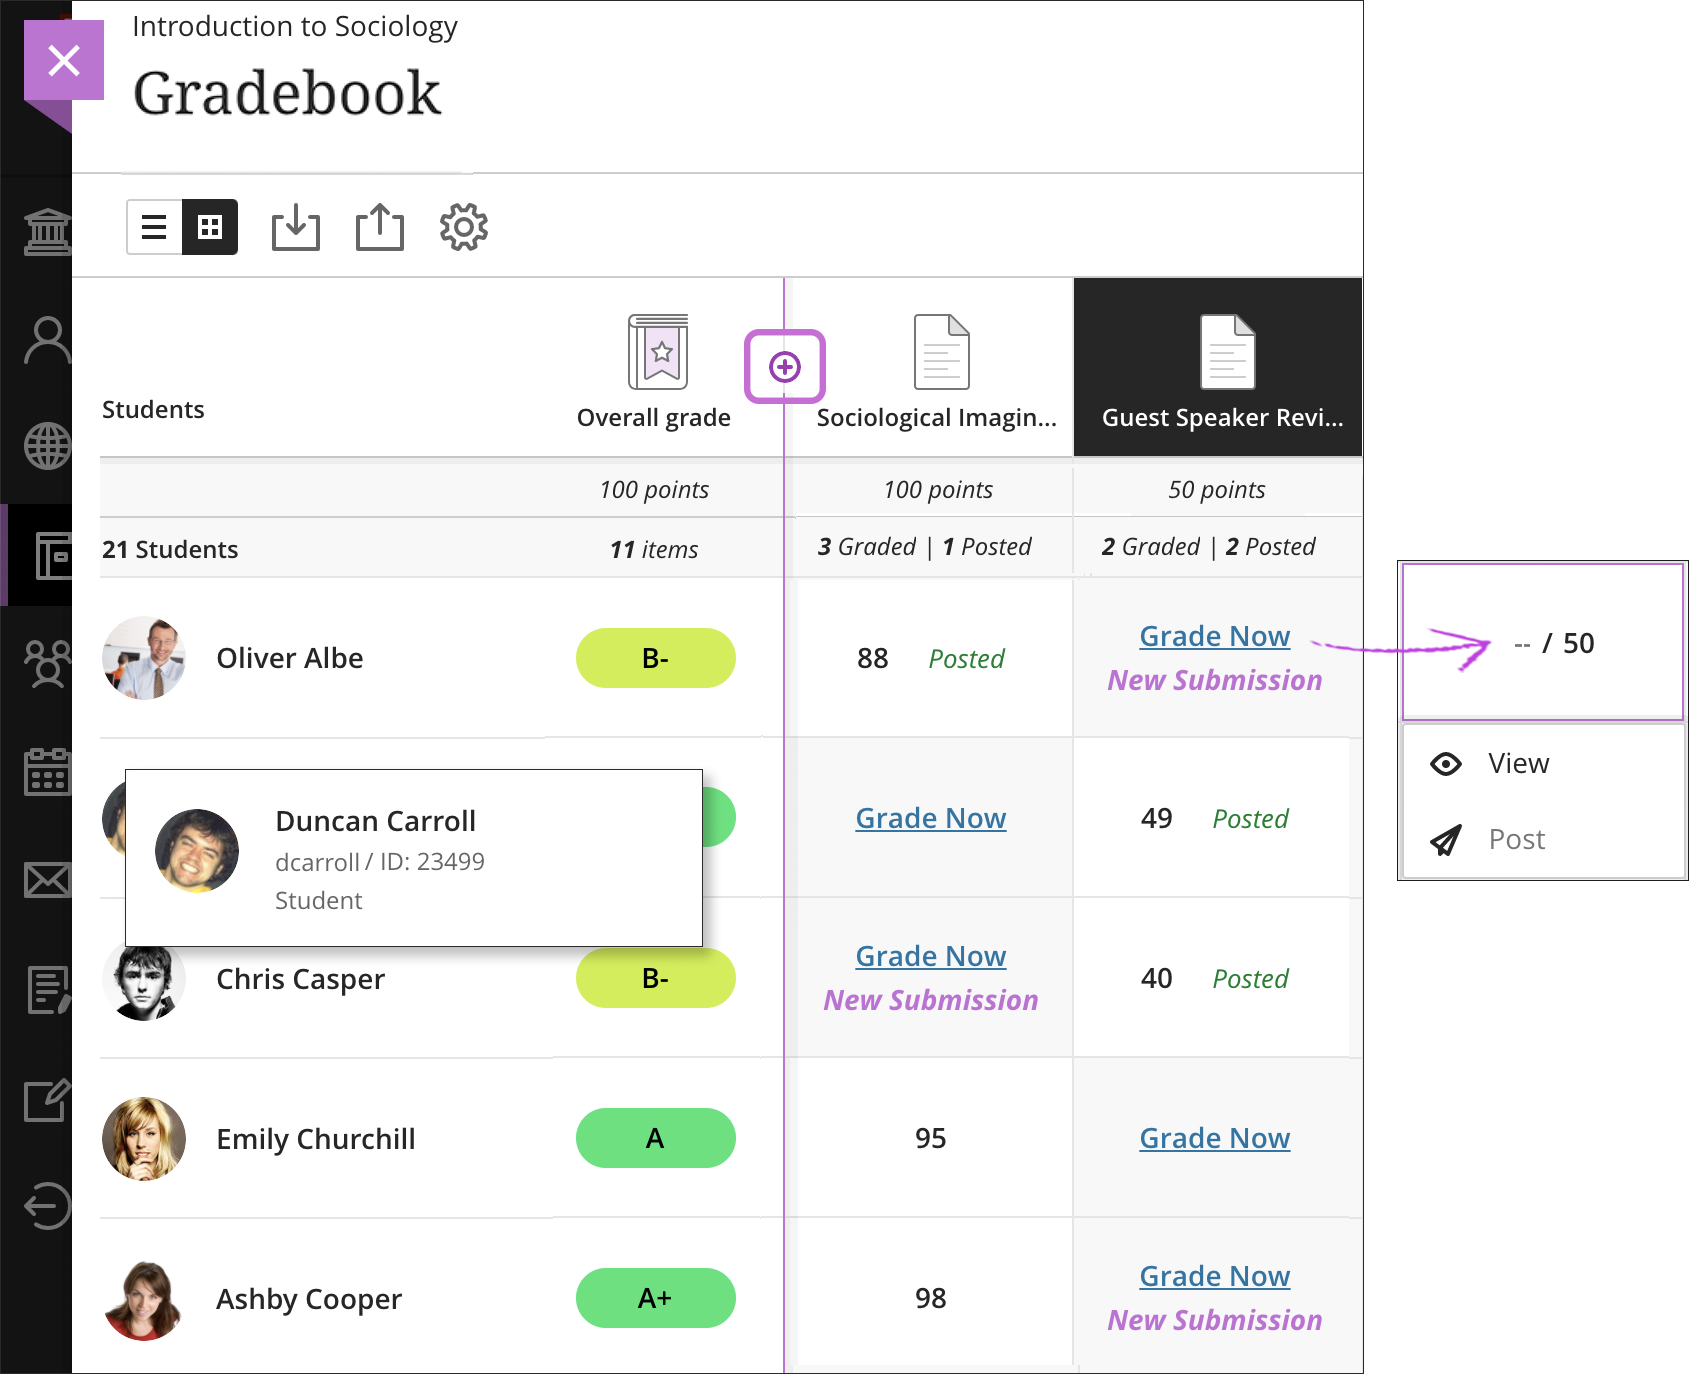
The student grid displays the scores students have earned. Select a cell to begin grading. You can switch to the Student Grades Grid by clicking the square grid icon at the top of the page (shown in the image below).
- To manage a column, select the column title to access the management functions, such as Edit and Delete.
- New Submission appears in cells when students have submitted work. Click anywhere in a cell to access the management functions or assign a grade. Select the cell or grade value to edit an existing grade or add a new entry. After you assign a value, click anywhere outside the grade area to save.
- If a submission exists, select View in the menu to view the student’s work. The View option is disabled if no submission exists.
- When you’re ready to release grades to students, select the Post option in the column header. All grades you’ve assigned for this column are posted for students to see. If you want to post one at a time, click within that student’s cell and select Post in the menu. Posted grades appear with a Posted message in the column.
- In each column header, you can view the total points for each item or calculation and easily see the grade each student earned.
- In each column header, the number of graded submissions appears, along with the number of grades you’ve posted. When you’ve graded and posted all the submissions, Complete appears.
- To add new items or calculations from the Grid View of the Gradebook, select the plus sign wherever you want to add an item or calculation.
Search Student Grades
In grid view, you can narrow your view to show only one student’s row, one column, or an entire category, such as assignments.
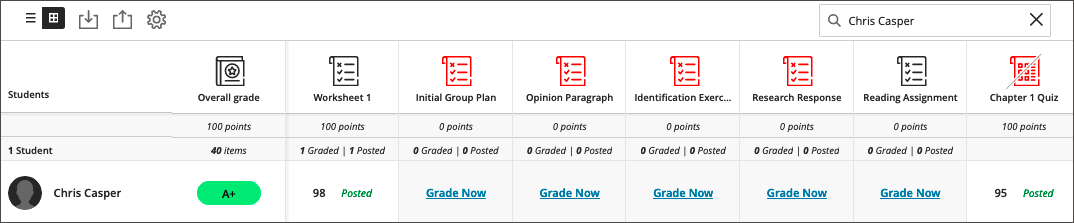
- In the search box, type one or more characters. The search results include all students, columns, and categories that match, in that order. Make a selection from the list or refine your search.
- After you make a selection, the student’s row, column, or category of columns appears. Select the X in the search box to return to the full gradebook grid view.
- In the student grid view, select Filter to open the Filters panel.
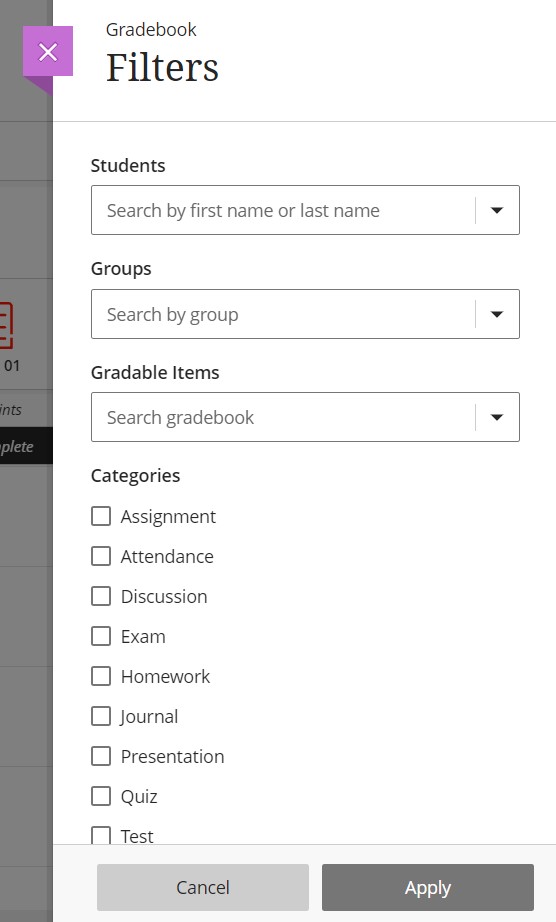
- Within this panel, sort by Students, Groups, Gradable Items, and Categories to change what is shown in the Student Grades Grid.
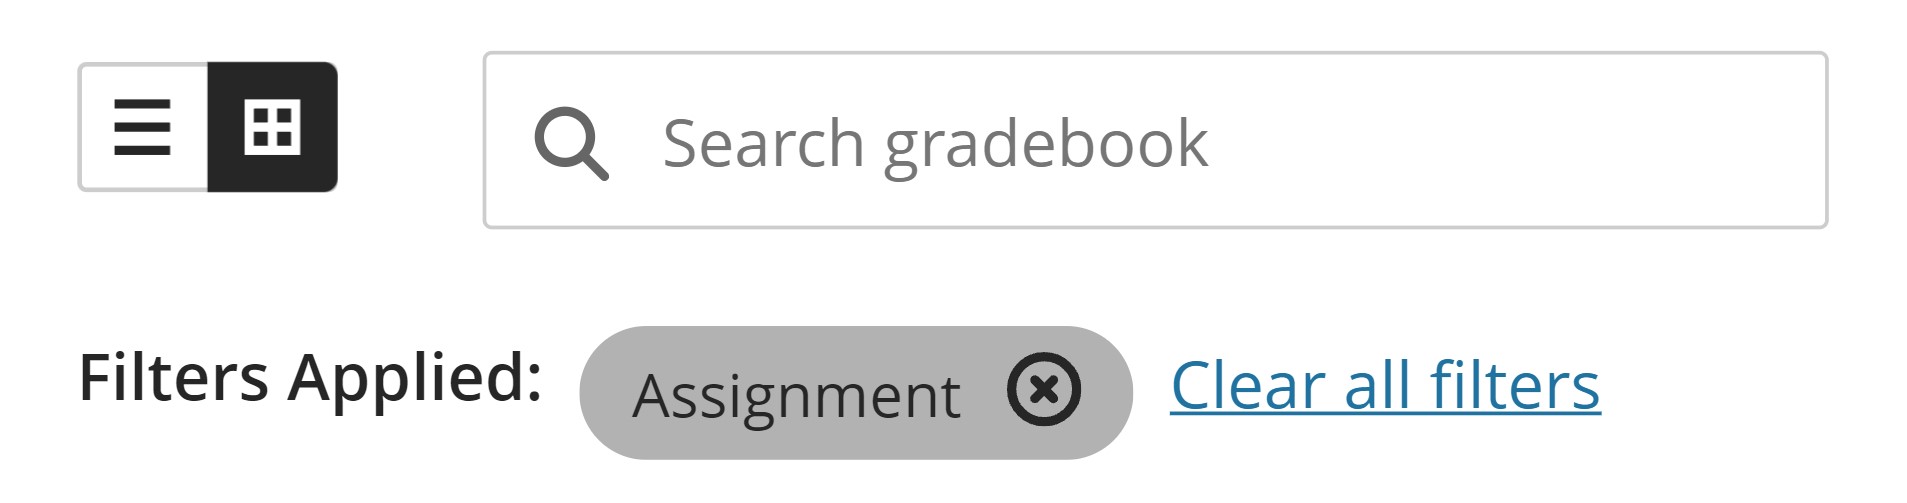
- Once filters are applied, they will appear under the search bar in the Student Grades Grid. Individual filters can be removed by clicking the X on the filter’s grey pill. Remove every filter to return to the original view of all students and gradable items by clicking Clear all filters.
Download & Upload Grades
You can download the full gradebook or select columns from your Ultra courses. You can export the file in a comma-delimited (CSV) or tab-delimited (XLS) format. You choose whether to save the file to your device or the Content Collection.
You can import your downloaded file into an application such as Microsoft Excel to do statistical analysis or other ad hoc computational work.
You can also upload a grade file you worked on offline and update your gradebook.
- In the gradebook, select the icon with the down arrow to open the Download Gradebook panel.

- Inside the panel, select whether you want to download the full gradebook or select columns.
- When you choose Select columns, a list of columns appears. Select the check boxes for the columns you want to download. Select the Show more link to display all the gradebook columns.
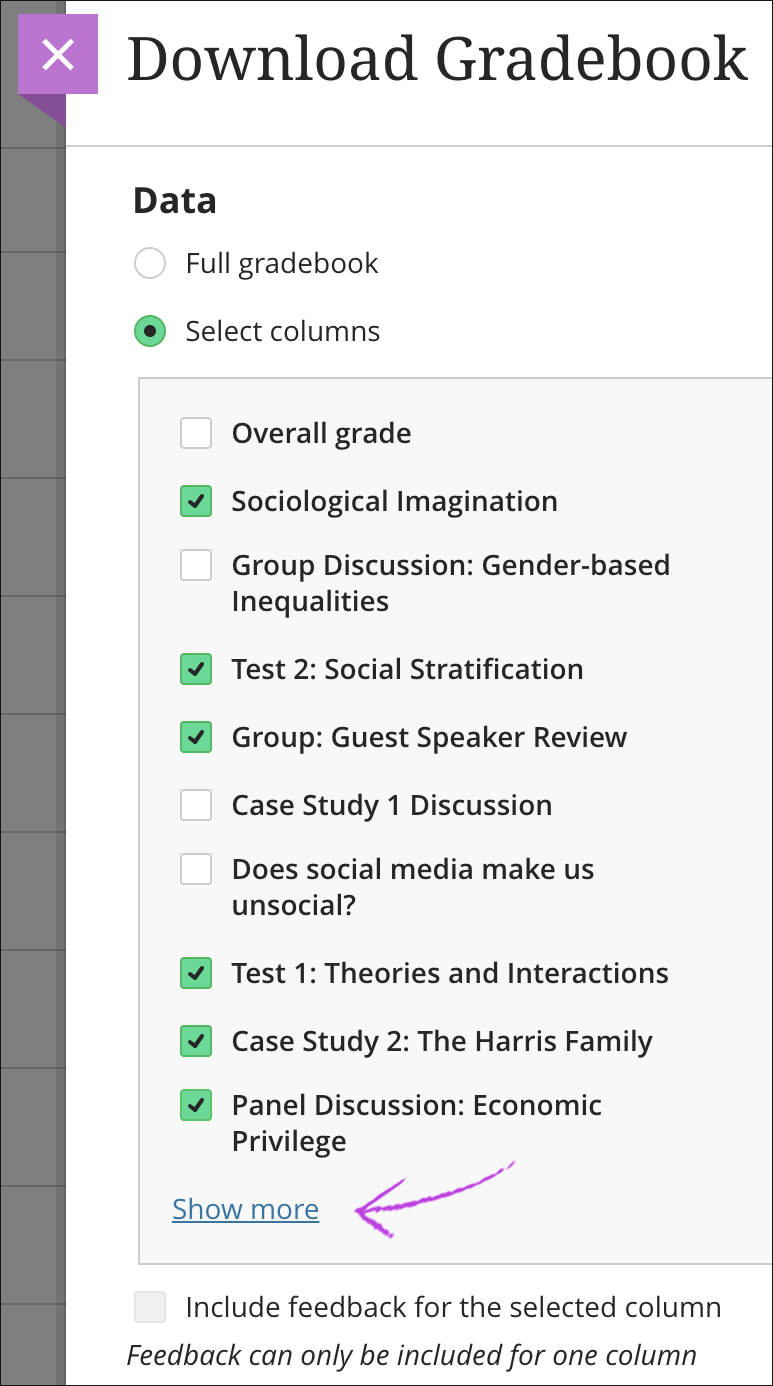
- You can only include feedback in the downloaded file when you select a single column. Select the check box for Include feedback for the selected column. If the single item you select is an assignment or test, feedback only appears if you posted the grade. For a manually added item and graded discussions, feedback appears for all grading statuses: posted, ready to post, and needs grading.
- When you choose Select columns, a list of columns appears. Select the check boxes for the columns you want to download. Select the Show more link to display all the gradebook columns.
- Select the file type for the downloaded file. Data files are comma-delimited (CSV) or tab-delimited (XLS).
- Select the location for the download. You can save the file to your device or Browse to select a folder in the Content Collection.
You can upload a grade file you worked on offline and update your gradebook. To upload a correctly formatted file, download the gradebook. Then, edit the file with the data you want to upload.
In the downloaded file, be sure to clear any cells you want to add a new grade to. For example, if “Ready to Post” appears with a grade, remove the text and the grade.
- In the gradebook, select the icon with the up arrow to open the Upload Gradebook panel.
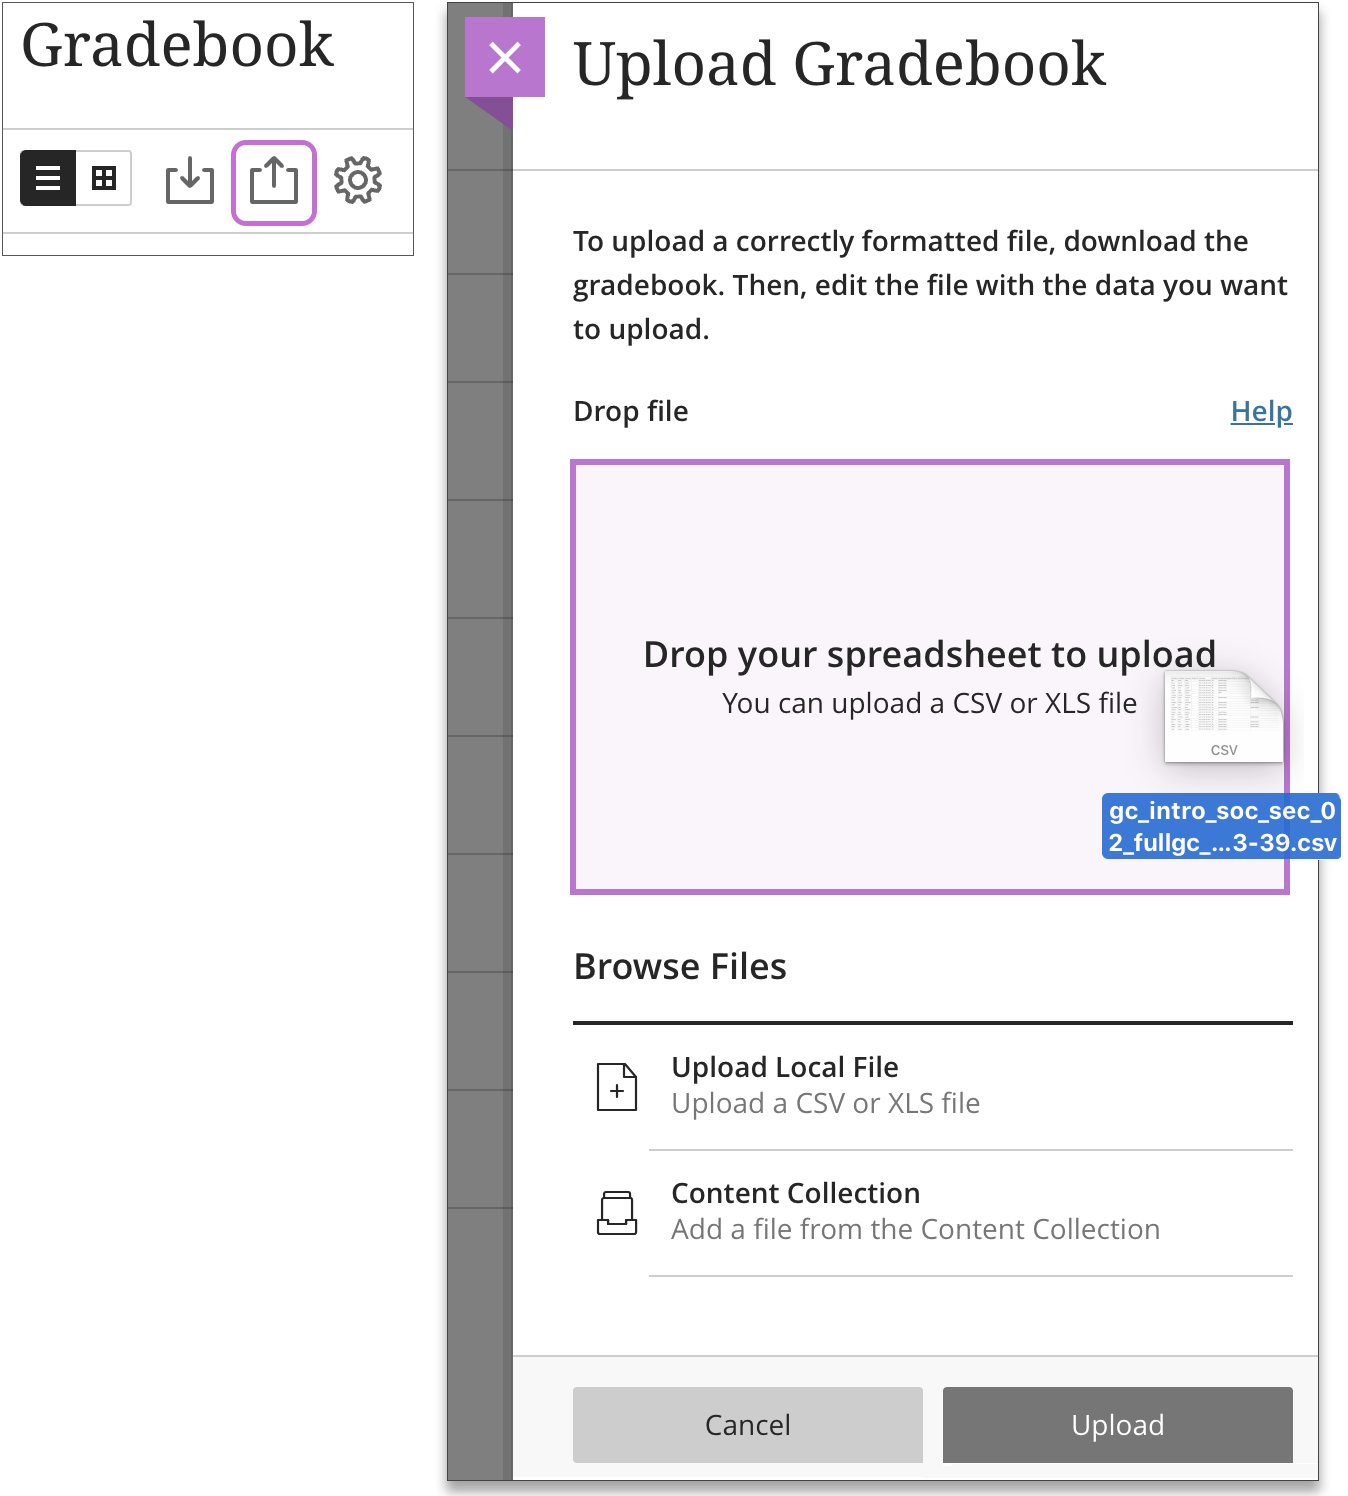
- Drag a file from your computer and drop it in the “hot spot” of the upload panel, browse your files, or use one you stored in the Content Collection.
- In the panel, you can review the list of columns you changed in the file you want to upload. Clear the check boxes for any data you want to exclude from the upload.

- In the grid view, columns with grade changes appear highlighted for a few seconds to show where the changes occurred.
- Any grade additions or changes you made to non-posted grades in the file appear as overrides in your gradebook. In the student list view, you can open a student’s submission and select Undo Override if needed. If you change a posted grade in the file, you’ll need to post the grade again.
Inline Grading with Bb Annotate
Blackboard Annotate is a tool developed to allow instructors to perform inline grading. Bb Annotate offers a robust feature set for instructors to provide customizable feedback to students. Features include a sidebar summary view, freehand drawing tools, various color selections, and much more.
Please see the following link to get started with Bb Annotate Inline Grading – https://www.bu.edu/tech/services/teaching/lms/blackboard/instructors/bb-annotate/
Overall Grade
In the Gradable Items list or student grid view, you can set up the overall grade. The overall grade is a calculated item that you build to show students a running tally of all the items that you grade and post.

- Select Set it up to create a gradebook column for the overall grade. On the page that appears, you can configure how the overall grade is calculated.
- Don’t want to display the overall grade? Select Hide this message to remove this prompt from your screen. If you change your mind, you can always change this setting in the Gradebook Settings.
- To get started, choose between Gradebook item weights or Gradebook category weights in Overall Grade Settings. The course content list changes based on your selection, and you can begin to assign grade percentage weights. If you use category weights to calculate the overall grade, you can expand a category to see the graded items included.
- Type an overall grade percentage for each item or category in the gradebook to give them more weight in the student’s grade. The total for all overall grade percentage fields must equal 100%.
- To make items or categories exempt from the overall grade, select the Exempt icon next to the overall grade percentage field. The item or category turns gray to indicate that it’s not included in the calculation. Select the icon again to include the item or category in the calculation again.
- Select Save when you’re finished. The Overall Grade column appears in the gradebook next to the student’s names so you can quickly see how each student is performing.
Overall grade calculation by grade category weights: an example
Here you find the explanation on how the overall grade is calculated by grade category weights in Learn Ultra:
| Possible Score | Category Weight | Score | |
|---|---|---|---|
| Assignments | 23 | 25 | 22 |
| Assessments | 20 | 25 | 20 |
| Journals | 20 | 25 | 10 |
| Discussions | 20 | 25 | 14 |
Total point calculation:
Total point formula:
Category possible score = (Total Category Points/ No of items in Category)
Possible grade = (Category score / Category score * Weights) * Category score
= 23/3 -> 7.6666 –> ((7.6667/7.6667) *.25) * 7.6666 = 1.91666
= 25/2 -> 12.5 –> ((12.5/12.5) *.25) *12.5 = 3.125
= 20/2 -> 10 –> ((10/10) *.25) *10 = 2.5
= 20/2 -> 10 –> ((10/10) *.25) *10 = 2.5
Overall possible points (Total points) = 10.04166
Overall grade calculation:
Category score = (Category Points/ No of items in Category)
Overall grade = ((Category Score / Category Total Points * Weight) + (Category Score / Category Total Points * Weight) + (Category Score / Category Total Points * Weight) + (Category Score / Category Total Points * Weight) + (Category Score / Category Total Points * Weight)) * Category Overall Weight
= 22/3 -> 7.33333 –> ((7.33333/7.66666) *.25) –> 0.23913
= 20/2 -> 10 –> ((10/12.5) *.25) –> 0.2
= 10/2 -> 5 –> ((5/10) *.25) –> 0.125
= 14/2 -> 7 –> ((7/10) *.25) –> 0.175
= 0.7391 * 10.04166
=7.42179
Overall grade = 7.4240 out of 10.04166
Overall grade percentage out of 100: (7.4240 /10.04166) * 100 = 73.91%
Override the Overall Grade
You can override a student’s overall grade if their performance or participation doesn’t fit the course’s grade schema.
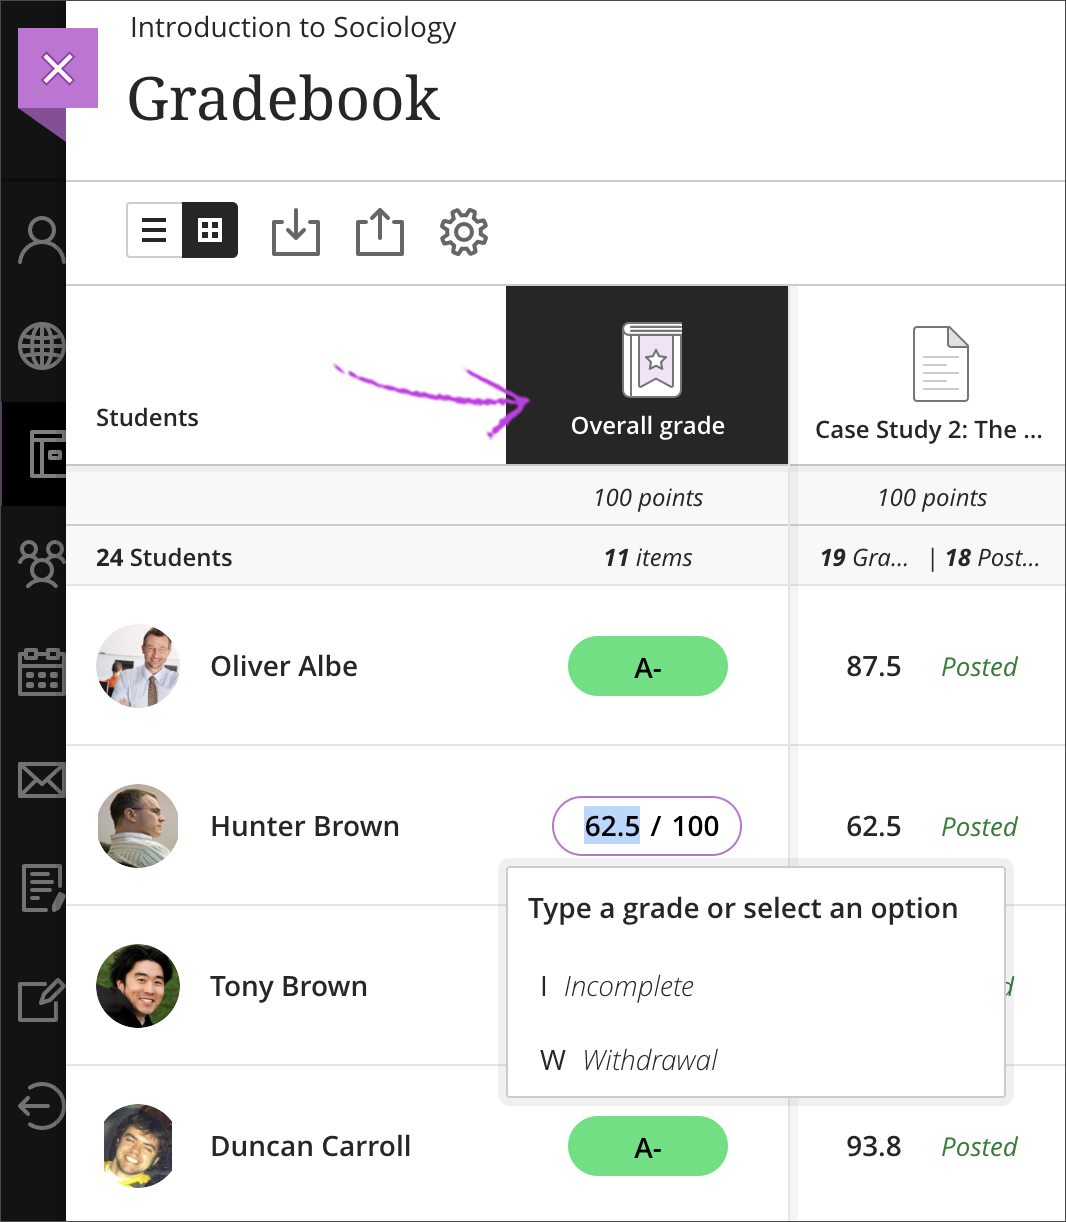
- To override a grade, select the grade cell in a student’s Overall Grade column.
- Type a new value or select an option. You can override the grade with a grade notation.
- An override is useful if a student can’t complete the course or otherwise doesn’t meet requirements for completion.
- Grade notations can include Incomplete, Withdrawal, and so on.
- You can create and manage overall grade notations in your Gradebook Settings.
If you want to remove an override, select the student’s overall grade cell and select Undo Override. The student’s overall grade reverts back to the calculation you set up for your course.
Gradebook Settings
From your course gradebook, you can add or make changes to your existing settings to fit your grading methods. Select the Settings icon to access the Gradebook Settings panel.
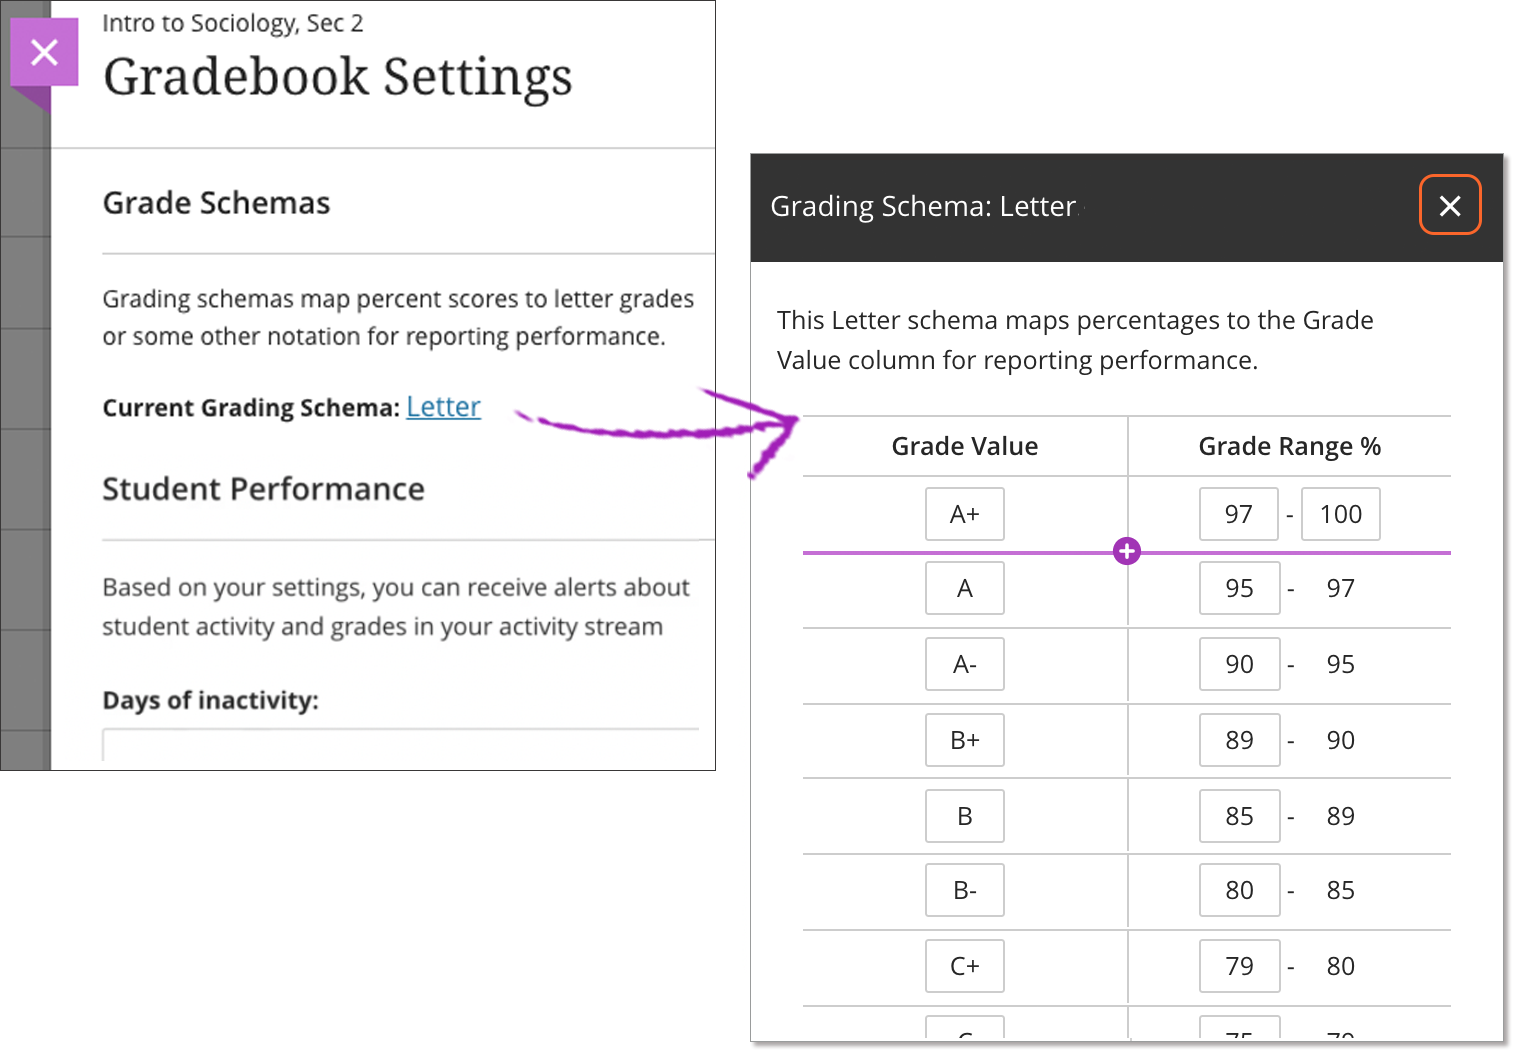
- From the Gradebook Settings panel, you can manage Grade Schemas and Grade Categories, add Automatic Zeros and establish Student Performance settings.
- From the Student Performance section, you can adjust the activity performance criteria required to receive alerts in your activity stream such as days of inactivity or limit percentage grades and, in turn, send those alerts to students. The link to View class performance behavioral graphic is visible only for those courses with enough data to populate it. Select View class performance to open the corresponding graphic and the list of students for the course. You can in turn select any student to check on an individual performance.
- You can make changes to the default Grading Schema. You can also view the gradebook categories and create and manage rubrics. In addition, you are able to create and manage grade notations to override a student’s overall grade and assign automatic zeros.
When you create a gradable item, it automatically appears in the gradebook and is associated with the appropriate category. You can use categories when you create calculated items, such as an assignments average.
- You can create new categories to customize how coursework is grouped in your course. You can use custom categories when you set up the overall grade.
- To create a new gradebook category, select the Settings icon. In the Gradebook Settings panel, select Add New Category and type a name.
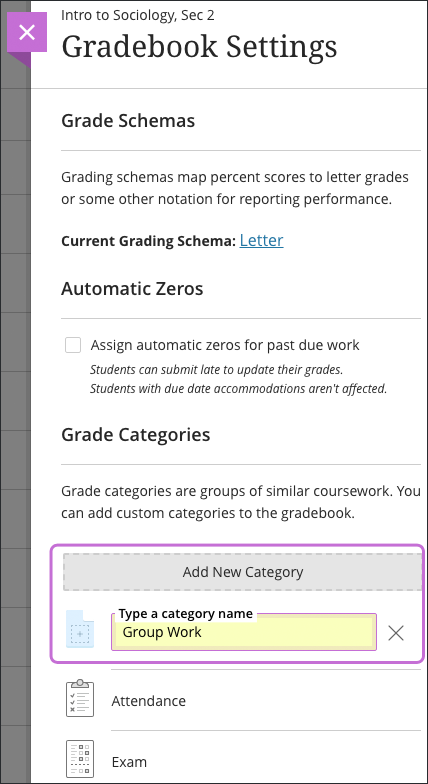
- Each time you create a graded item in your course, you have the option to change the grade category so the item is grouped into one of the custom gradebook categories. On the Gradebook Settings panel, select the custom category in the Grade Categories menu.
You can choose to automatically assign zeros to missing work past the due date. Students and groups can still submit work after an automatic zero is assigned. Then, you can grade as normal. After you enable this setting, you don’t have to go through your gradebook to manually assign zeros. The automatic zeros setting applies to these graded items:
- Assignments and group assignments
- Tests and group tests
- Graded individual and group discussions
- In the Gradebook, select the Settings icon to access the Gradebook Settings panel. Select the Assign automatic zeros for past due work check box.
- This setting is enabled by default.
- Select Assign Zeros. All past due work will receive automatic zeros. Affected students’ point totals will update.
- In list view, students’ grade pills display “0” when no submissions exist and the due date has passed. The label Automatic zero appears next to the grade pills. The label Complete also appears as you have nothing to grade. Automatic zeros are posted automatically.
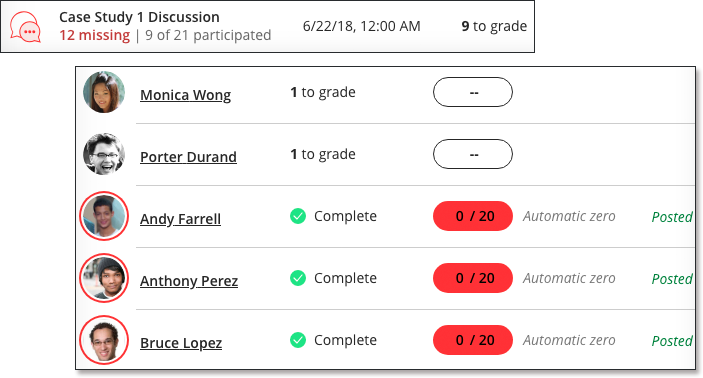
- Students can submit late to update their grades. You may want to include how late work is graded in item instructions or your syllabus. When a student submits after the due date, the automatic zero is removed. A late label appears with the submission date and time.

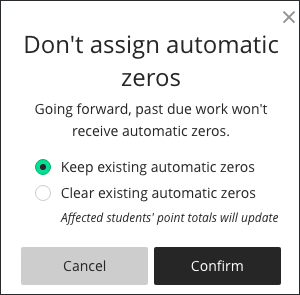
- You can disable the automatic zeros setting at any time. In the Gradebook Settings panel, clear the automatic zeros check box. Next, make a selection:
- Keep existing automatic zeros
- Clear existing automatic zeros