- In Thunderbird, go to Tools > Account Settings.
- Click Account Actions at the bottom.
- Click Add Mail Account
- Enter your full name (it will be used when sending emails from this account), your full BU email address, and your Kerberos password. Click Continue.
- Authentication will likely fail at first. A new box with Your login, will appear. Enter your full BU email address again.
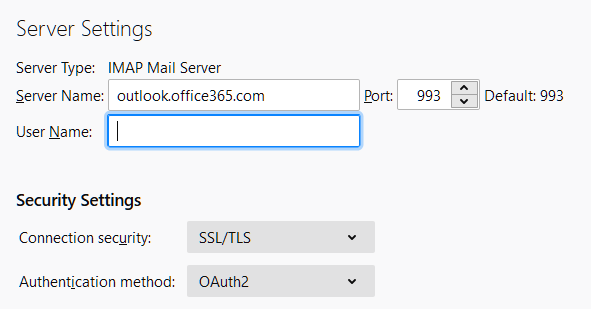
- Use Configure manually on the Thunderbird client to open server settings. You will be prompted to enter your server settings.
- Incoming Server Protocol: IMAP
- Server/Host Name: outlook.office365.com
- Port: 993.
- Leave the remaining information as is – for now.
- Hostname may have a default value. Clear this field.
- Client on Advance config
- A pop-up will appear asking to confirm that you wish to proceed to advanced configuration; click OK. This step is needed because the Authentication Method needed (OAuth2) is not available in the manual configuration server settings drop-down menu.
- Connection Security:SSL/TLS
- Authentication Method: OAuth2
- These settings should automatically be saved
- Close Tools/Preferences and go back to the inbox tab/window.
- Click on Inbox underneath the BU account. After a second of loading, the BU ADFS sign-in page will load in a mini-browser/kiosk window. BU email address is pre-filled. Enter Kerberos password and click Sign in.
- You will get a Duo prompt. Authenticate through Duo as you normally would. You do not need to check the Remember me for 30 days because the mail app will remember your account information.
- If you are asked to remain signed in, select No as the app will remember your account information/stay signed in.
- There may then be another prompt for “Permissions requested” Thunderbird would like to: follow a list of access items. Click Accept to proceed.
- The mini-browser window will close. If your emails do not start loading automatically, click on Inbox again to trigger a sync request.
Incoming Server
Outgoing Server